Monday 25 August 2014

Classic Custard Biscuits


I think if you are living in Europe and if you have BBC and you love Baking, I am sure you know about  Great British Bake Off  I am hooked to the series from the time they started couple of years ago.

And it started again with 12 candidates 3 weeks ago and every week I am watching the programme and forcing Hans to watch with me too.
And this year I thought I will make something from each series.
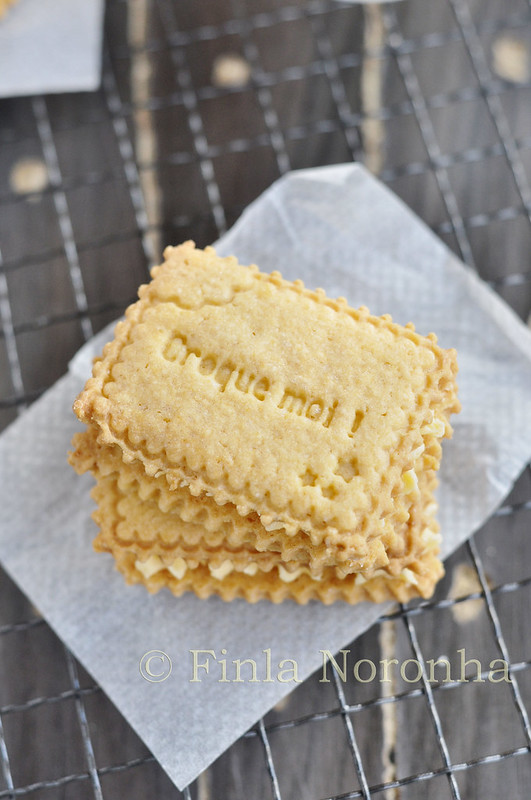
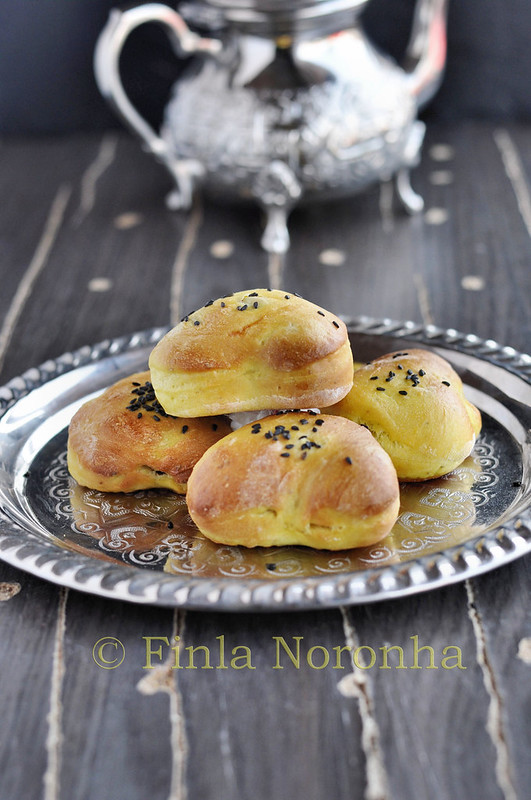
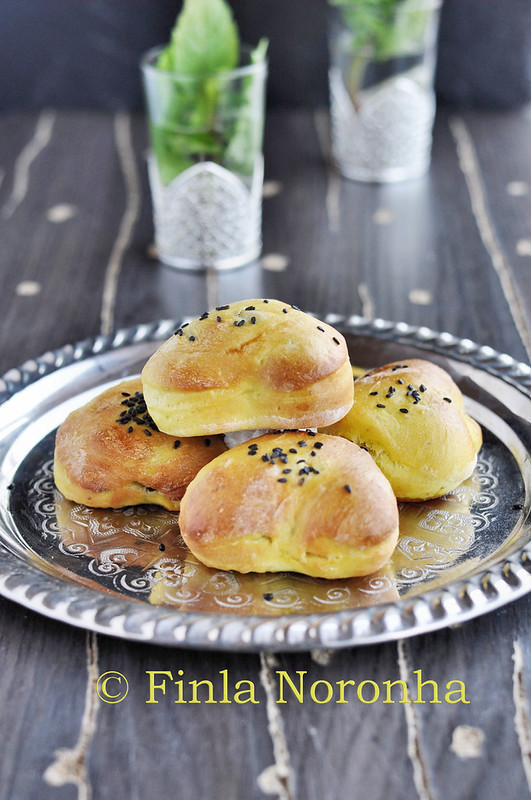
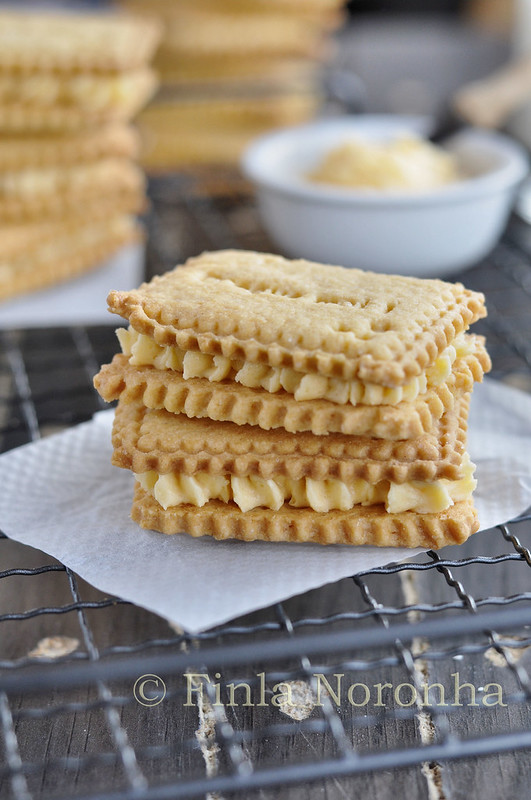
I have made something from the first week, but when I made these custard biscuit and shared the picture in my Instagram and Fb everyone wanted to have the recipe, so I though I better add this recipe first.

I always loved custard biscuits, even though here in Belgium they are not common, it is common in India and also in England. And every time I go to the British store or when ever I go to UK i pick up few packs of custard biscuits and bourbon biscuits.

I must say even though you can buy them  cheap, the home made ones are so  delicious, once you had home made ones I think you will never buy from shops.
I have to say mine lasted 3 days and they were good on the third day too. I don't know how they will taste after that ,if they would be still crunchy as mine didn't last that long.


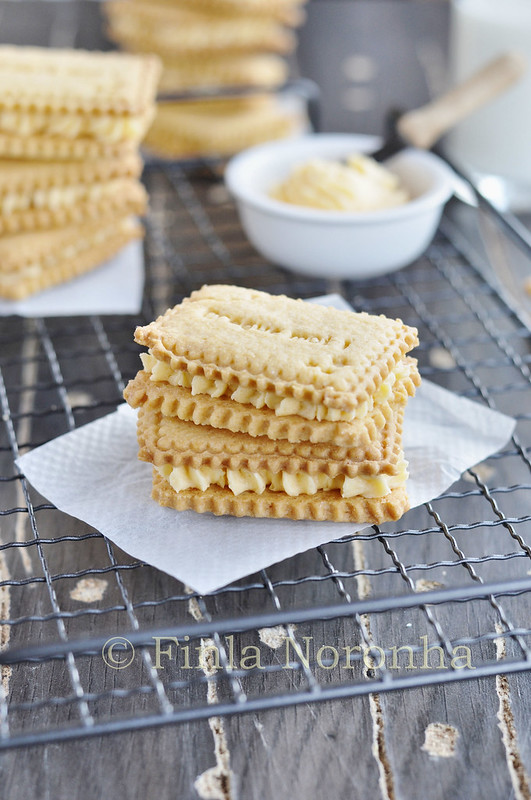
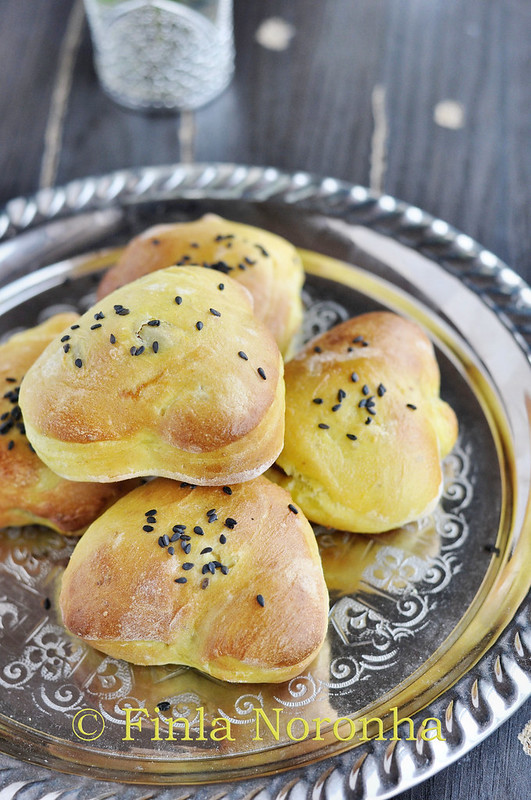
When I saw this Classic Custard Biscuits in one of the many Facebook groups I am in, I knew I will be making them, and asked her were she got the recipe and she shared the link to everyone's delight in the group.


Tip:
Mine baked in 12 minutes. I didn't used the traditional square size, I used my cookie stamper.


Ingredients
200 g (7oz) plain flour, plus extra to dust
50 g (2oz) Bird's custard powder
1 tsp baking powder
75 g (3oz) caster sugar ( I used 60 gm)
125 g (4oz) unsalted butter, chilled, cut into cubes
1 medium egg
1 tbsp milk

FOR THE FILLING
Ingredients
75g (3oz) unsalted butter, softened
125g (4oz) icing sugar
2tbsp Bird's custard powder

Method :

For the biscuits, put the flour, custard powder, baking powder, sugar and butter into a food processor. Pulse until the mixture resembles fine crumbs. Alternatively, rub the butter into the flour mixture using your fingertips.
Add the egg and milk and pulse until the mixture just comes together. Tip on to a work surface, bring together with your hands, then wrap in clingfilm and chill for at least 30 min or up to 1 day.

Preheat oven to 180°C (160°C fan) mark 4. Line two baking sheets with baking parchment. Lightly flour a work surface and roll out dough until 3mm (⅛in) thick. Cut it into an even number of 3cm x 4.5 cm (1¼in x 1¾in) rectangles, re rolling trimmings as needed. If you like, mark the rectangles with a diamond and a dot in each corner.
Put rectangles on prepared sheets and bake for 13-15 min until lightly golden. Cool on the sheet for 3min, then transfer to a wire rack to cool completely.

Meanwhile, put the softened butter into a large bowl and sift over icing sugar and custard powder. Mix to combine (don't add water as it needs to be fairly thick). Set aside.
When the biscuits are cool, sandwich together with some of the filling, using a piping bag if you want a neater finish.

Wednesday 20 August 2014

Soba Noodle Salad With Radishes


I wanted to try something new that the usual cold pasta salad I make when it is hot weather.
So I was going through my Wagamama Cook book and saw the recipe for a noodle salade.
I made little change plus I like more dressing so I adjusted the dressing to my taste.
So the recipe I have written below is not exactly as in the book. I just made a little change for my liking.

Serves 2:

125 gm Soba noodles
12 to 14 radishes thinly sliced
1 carrot Juilenned
1/4 cucumber ,deseeded and finely sliced
2 to 3 spring onions finely sliced
6 to 8 mint leaves roughly chopped
Couple of corriander leaves chopped
1 red thai chilli sliced ( you can add more if you like it spicy but i think the samade should not be over spicy)
Tosted sesame seeds and white seasmae seeds fro garnish
Juice of 1 lime and zest

Dressing:

2 tsp of honey
2 tsp of fish sauce
2 tso of rice vinegar
2 tsp of mirin
Salt and pepper to taste

Mix together the dressing ingredients in a small pan, bring to boil and set aside to cool. When it is cool stir the lime juice and the zest.

Cook the noodles according to the packet instruction drain and refresh under cold water.

Combine the noodles with the radishes, cucumber,spring onions,mint, chilli and corriander.
Add the cooled dressing and toss everything to make sure that everything is coated.
Check the seasoning and if you want add more salt.
Sprinkle with the both the kind of sesame seeds and serve.

Wednesday 6 August 2014

Pasta with Scampi Lime and Saffron


I have been always a huge fan of Peter Minakis Greek Food blog Kalofogas and that has been for years. And I have made few dishes from his place which are all absloutely Delicious.

And when he posted this Scampi recipe I remember saying to myself I am going to make this one day, but then as always there is so many dishes I want to make and sometimes it happens like this one.
Have to say only regret I have is that why I hadn't made this one earlier as it is so Delicious.
With the zest of lime it is a real refreshing pasta dish.


You can always make exactly as Peter has made, I kept ti the original recipe just that I made with less pasta but mostly kept the rest of the ingridients quantity for the amount of pasta he used.

And instead of white wine I used Nolly prat as I always have a bottle of that and I tend to use that when I don't have opend up wine or wine in the freezer for cooking purpose.
And ok I did add a bit more chilli flakes :-)


The Original recipe you can find here


350 gm Pasta ( I used Linguni)
1/4 cup olive oil
18 medium sized Shrimps
1 onion finely chopped
8 garlic thinly sliced
100 ml Nolly Pratt
Few stands of Saffron
Zest of 2 Limes
Juice of 1 lime
1 tsp chilli flakes
1/4 cup freshly chopped parsely
1/4 cup sliced spring onions
Black and white seasame seeds for garnish
Salt and pepper to taste

Method:
Season the scampis with pepper and salt.
Heat a pan with a little of oil and fry the scampis for 1 minute each side and keep it aside.
Add the rest of the olive oil and add the chopped onions and saute for few minutes ,
Add the garlic slices and the chilli flakes and fry for few minutes.
Add the Nolly prat and cook in a high heat for couple of minutes .
In the mean time cook your pasta according the the packet instruction , drain,make sure you keep a few bog spoons of pasta water to add later.

Now add to the pan, the chopped parsley, lime juice,chopped spring onions and the lime zest and the drained pasta together with the few spoons of pasta water.
Add the scampi's which are kept aside , mix everything together and serve with a sprinkling of seasame seeds.
If you like you can sprinkle with a bit more chilli flakes.


Thursday 31 July 2014

Bloggers Meet in Brussels


Photo Courtesy BxlFF    

I have been wanting to write a post about the Blogger Meet we had in Brussels on June 21st which was Organized by Brussels Food Friends , and it got delayed as I wanted to make something really special with the chocolate which was in the Goodie bag.

But then Hans was off in June for a while and Shyama didn't come home from Leuven as it was exams for her then now in Jully is gone also for 2 weeks ( ok he is coming back from Malta tomorow) and then Shyama also left to Egypt for 2 month as you all know ( if you are a regular reader)

To make a dessert just for me , that is a big no as I woudn't do that not because I don't like desserts just that I am afraid I will eat the whole lot.

Now to the blogger meet Ananda and I decided to meet up at Brussels Station so that both of us could go together to the venue which was
Bloom Hotel.
The guest speaker was Miss Foodwise and she was so lovely wearing her signature dress and she did give plenty of tips for blogging.


Miss Foodwise talking to the bloggers


I shared this picture in my Facebook and my friends commrnted we three can go for Tooth Paste Add :-)

The meeting was by 2:20 pm so we had cakes, waffles with variety of topping plus plenty coffee /Tea etc.
It is the first time I go to a fully English speaking blog meeting which was really good, almost every one spoke English, which was so easy as one could talk to every one.
We got to know each other much better as it was like a game, we had to fill in some 12 oe 15 questions and for that we had to go to other bloggers and talk which I thought was such a wonderful idea otherwise I would just stick to your own bunch of few people one knows and now we could mingle with every one as one wanted to fill these questions, 
I am giving a idea what these questions were , we had to ask another blogger what their favorite blog was, what is the food they would never eat or what was their comfort food .... which I thought was so good and which able eveyrone to mingle easy.

Goodie Bags

This was inside the goodie bag too - Photo Courtesy BxlFF 
Photo Courtesy BxlFF - While going back home I coudn't resist so I ate my cookie on the trian whch was super delicious.

All in all it was a fun afternoon and they are planning in October/Novermeber another meet which I am so looking forward for going.
And one of these days I will make something with the chocolate which was in the goodie bag.
Facebook Page from BxlFF


Photo Courtesy BxlFF 


Photo Courtesy BxlFF 

I would like to thank the Maxine,Alison,Andrea and Michelle for organizing this meet.
Of course all the sponsors too.

Berry Almond Tarts


The moment I saw this Delicious Berry Tart in Bakedbree I know I will be going to make them.
And if you are planning to make this go to Bree's blog and check the beautiful pictures of the tart and also the beautiful step by step pictorials.

But then that time the berries were just not in full season and they were still a tad expensive, so I waited till they were fully in season then I know they will be cheaper.
And anyway I am a sucker for anything frangipane, and this one resembled like that and I knew I would make it sooner or later.

Of course when I served the tarts, for hubby I served with chipped cream as he loves to have it with fruit tarts.
We loved the tarts and I am sure I will be making them again as it is so easy to make plust they are so good.
  • 1/2 cup plus 2 Tablespoons (130g) butter, room temperature
  • 3/4 cup sugar
  • 1 Tablespoon lemon zest
  • 1 Tablespoon orange zest
  • 1 vanilla bean, split and scraped
  • 1 1/2 cups almond meal
  • 1/2 cup flour
  • 1/2 teaspoon baking powder
  • 3 eggs
  • 1 cup sliced almonds
  • 2 cups berries
  • Method:
  • Put the butter, sugar, zests, and vanilla bean in the bowl of an electric mixer. Cream for 6 to 8 minutes or until light and fluffy, scraping the sides of the bowl occasionally.

  • Whisk together almond meal, flour, and baking powder. Set aside. Add the eggs one at a time. Add the dry ingredients and mix until just combined. Take the bowl off of the mixer and fold in the almonds
  • Scoop the batter with an ice cream scoop into 6 paper tart pans or an 11-inch fluted tart pan that has been sprayed with cooking spray.
  • Add the berries and gently press into batter.

  • Bake in a preheated 325 degree oven for about 30 minutes, or until golden brown. (If you bake in a large tart pan, it will be closer to 45 minutes. (Mine was baked in 25 minutes. So i thing it depend on your oven and your tart shape)


Thursday 24 July 2014

Komaj - A Persain date bread with cumin and Turmeric


This bread was supposed to be baked last month from the group I am We Knead to Bake but June was a very busy month and knowing me if I don't lake the bread in the first two weeks when the recipe is given I get lazy to make them.
Anyway yesterday I thought I will just cheer me up ( that is what I do take or cook something when I am a little bit down) as I was missing Shyama and Hans.
Usually Shyama comes for the weekend when Hans is out of the country but now she is in Egypt it is the first time I don't have both of them here.
So I was feeling a little down I know I know silly Indeed.
I didn't sprinkle the crushed cumin on top of the bread as I wanted to give my FIL also and I thought he might think it is weird cumin on top of a bread so I sprinkled black seasame seeds.
Tip:
When I make the filling for the bread I would double up the filling ingridients otherwise you won't have enough filling.
The bread is best on the day of baking, I had 2 left over and I ate them for breakfast next day then they were not as good as the fresh ones ( but then I think all buns are like that)


Komaj (Persian Date Bread With Turmeric & Cumin)
(Adapted from Saraban – A Chef’s Journey Through Persia by Greg & Lucy Malouf)

Ingredients:
For the dough:
1 tsp active dried yeast
1/8 cup warm water
3 3/4 cups bread flour (or all-purpose flour)
2 1/2 tsp cumin seeds, toasted and lightly crushed
1/4 cup sugar
1/2 tsp turmeric powder
1/2 to 3/4 tsp salt
1 egg (optional)
2/3 cups warm milk
1 1/2 tbsp olive oil
For the filling:
12 to 15 dried dates, pitted and cut into chunks (the slightly soft kind)
25 gm unsalted butter, soft at room temperature
4 to 5 pods cardamom, powdered

Milk/ cream for brushing dough
icing sugar, for dusting (optional)


Method:
Dissolve the yeast in the warm water and keep it aside for 10 minutes and it will have bubbled up a little.
Put the flour, 2 tsp of the crushed cumin, sugar, turmeric and salt in the bowl of your food processor and run a couple of times to mix. Then add the yeast mixture and the egg and run the processor again, till it is incorporated.
Now add the milk and olive oil, and knead until you have a smooth and pliable dough that’s not sticky. Shape the dough into a ball and place in a well-oiled bowl, turn to coat the dough and then cover loosely and let it rise till it has doubled (about an hour or so).

When the dough has risen, deflate it and then shape into a round. Put it back in the bowl for a second rise till it has doubled (an hour or so).
In the meanwhile prepare the filling by mixing together the chopped dates, soft butter and cardamom together in a bowl.
Divide the dough in to 4 equal portions, and divide each in half so you have 8 portions. Working with one portion at a time, roll each one out into a rectangle that is about between 1/4" and 1/8” thick. Choose a cookie cutter that is about 8cm at the widest. Press it down lightly n one half of the rectangle to guide you to put the filling.

AT this point, I brushed a little water over the entire surface to make sure the dough would stick well when folded over.
Then place about 1 tsp (more than this is not necessary) in the centre of the cookie outline and then fold the other half of the rectangle over the filling so that it’s now a covered square. Using the cookie cutter cut, with the filling in the centre, cut out the bun making sure the sides are neat and well sealed. If the sides are not well sealed, the bun will swell and open up during baking. It will taste good but look weird!

Repeat with the remaining portions of dough, then reroll the scraps and you should be able to make two more buns making a total of 10 buns. Place them on a lightly greased baking tray leaving space between them because they will puff up on baking. Let them sit for about 15 minutes.
Then brush them with a little milk (or egg wash if you use it) and sprinkle the remaining ½ tsp of crushed cumin on top, pressing it down a little with your fingers. Bake the Komaj at 200C (400F) for about 8 to 10 minutes.
Let them cool on a rack a little and dust with icing sugar if you like. Serve them warm with tea or coffee. These are best eaten the day they’re made. Leftovers can be reheated and eaten the next day.
This recipe makes 10 Komaj. (Depending on the size you make) I made small ones so i got more.

Tuesday 22 July 2014

Bacon Burger


I know it is a while I posted something on my blog.
Reason is same as usual, busy, lazy , summer etc....
Plus Shyama left to Egypt a week ago for 2 months as she was accepted to join a Excavation team to her delight ( we knew couple couple of months ago)

They say third time lucky as twice her trip got canceled because of the the political situation there and she was really hopping that nothing will go wrong this time.

Any way she is doing very well there she is staying in Luxor in the West bank and yesterday I skyped with her for the first time as she didn't had internet connection till two days ago.
And got a virtual tour of the house she is staying and heard from her how everything is there etc... and I feel much better as I was really not feeling that good about the idea she beeing there etc... ofcourse normal I think for a mom to be worried.


Now to the recipe , I made this burger a while ago and I thought I better blog this before the summer is gone.
I wanted to take a picture of the burger for the blog so in the hurry to take picture I totally forgot to add most of the garnish, but I have a pic in the post with all the garnish which I took before I ate mine :-)


For 4 people:

600 gram pure beef mince
2 tbsp of fried onions ( the one we get from the asian store)
Pepper and salt to taste
1 tbsp of butter or oil
8 slices of bacon ( used 2 slices per person) ( I fry them in a little oil till cisp)
4 slices of cheddar cheese
1/2 red onion finely sliced
4 tbsp of fried onions
4 slices of tomatoes
Few slices of pickled Jerkins
4 burger buns ( I used pistolet which we get here)

Ingredients for the sauce:
3 tbsp mayonaise
2 tbsp mustard
3 tbsp of sour cream
1 tbsp of chopped chives
Salt and pepper to taste
( Mix all the ingredients for the sauce )

Mix the beef mince, with 2 tbsp of fried onions with salt and pepper and make 4 burgers.
Heat butter/ oil in a pan and fry / grill the beef burgers both the sides till they are cooked inside.

This is how I serve them.
Preheat the oven  slice each buns into half, and heat them up in the oven the same time on top of each burger I keep a slice of cheese and keep under the grill in the oven to slightly melt the cheese.
When the buns are hot and the cheese is melted. Assemble them topping them with slices onions, tomato, jerkins, fried bacon and then sprinkling the fried onione and add a tbsp of the sauce. Close the burger with the other slice and serve with friets ( french fries)

Friday 4 July 2014

Meat balls with Brown Beer


I have not made anything new recently as it has been good weather and summer holiday started from July 1st.
When it is good weather I tend to cook less as we tend to go for cycling or to the beach ( even though we are not sun worshipers like lot of the people here, we go to a place where it is not allowed to swim ( even though people swim there ) they say it is prohibited to swim there as no gaurds to keep a eye on the swimmers and no professional people is there to help you when something goes wrong.

But we go there as it is so quiet and no tourist ( not that much)
And we site there for a while enjoying the quietness and the coolness or the hotness :-) always wearing a cap .
So as I was saying ther eis no cooking, I make sandwiches or something like that for lunch and then we go after that for cycling etc....

So this is something I made when it was much cold weather and If I remember buying this magazine Libelle lekker months ago specially as I saw this meat ball recipe.
I did made the same week, but then the magazine got lost ( yeah in my small place) I didn't know where I kept them and as end of June Hans was gone for a week, I decided to clean up my book shelf and there it was in between piles this magazine.

Ingredients:

2 white slice of bread
100 ml milk
2 onions finley chopped
1 tsp fresh chopped thyme
1 egg
A pinch of nutmeg
500 gm mixed mince ( I used beef and pork)
1 tsp of salt
Freshly ground pepper
70 gm butter
2 shallots finely chopped
2 cloves of garlic very finely chopped
2 tbsp of flour
500 ml belgian brown beer I used Chimay
1 tbsp Apple or pear syrup

Method:

Soak the bread in milk doe 5 minutes/
Squeeze the milk out and add into a bowl together with the mince meat, onions, thyme,egg and thyme. Add salt and pepper for taste and mix everything well and make meat balls.

In a pan heat 20 gm of butter and brown the balls all sides brown ( this will take 4 to 5 minutes)

Add the rest of the butter in a another pan, and saute the onions and garlic for 3 minutes.
Add the flour and fry for 1 minute.
Add the beer and whisk till ther eis no lump.
Add the apple /peer syrup. Add pepper and salt to taste and pour this mix into the pan were the balls were frying.
Cook the meat balls in the sauce for 20 to 25 minutes till the balls are cooked.
Stir once in a while.
Tip: If you think after the meat ball is cooked and the sauce is a bit runny you can thicken it up by adding a bit of conr flour mixed with water to thicken the sauce.
Serve with potato mash and enjoy.


Friday 27 June 2014

Macarons With Cheesecake and Raspberries


There was a time when I was so crazy for making Macarons , that when I just mentioned the name macaron Hans and Shyama got nuts.

As you all know Hans used to hate macarons in the begning when I started making them as he thought they are to sweet etc... but I always did sneaky , I mostly made a filly with some kind of boose so then Hans would be tempted to eat them :-)
I do have to admit he likes them when the filling is special.

Anyway there is no panick in my home for macarons as I haven't made them for a while.
These macarons I made a while ago and actually I don't know when I made them , only thing I know it must be a while ago.

I was planning to do a guest post for a friend this macaron when I made them, but then one or the other thing came up and it didn't happen .
And now I thought it is about time I posted these as the filling is so good.

When I Sandwich the macarons I kept inside each of them a small raspberry and gave a press so then got squached together with the cheese cake cream.
Which is absloutley super delicious, minus point as there is a fresh fruit inside I think the macarons should be ate in two days otherwise they get too soft because of the moisture from the fresh fruit.
Well if i remember the filling was so good that the macarons didn't stay that long in our fridge.


 As always I stick to my Ottelenghi recipe fro Macaron and if you want to see the step by step pic how to make them just click here


110gm icing sugar
60gm almond flour
60gm egg whites (of 2 eggs) ( Normally you have to age the egg whites, which I suggest you do too, but these days I find myself not agening them but I don't take the freshest egg, I just take egg which is atleast a week old and then make the Macarons when ever I want as I don't like the agening part of the whites as I am a impulisive baker, but don't listen to me age you eggs )
40gm castor sugar
Few drops of any food colour ( pink i used)
Freeze droed raspberries to add on top ( optional)

Whiz the almond flour and icing sugar in the coffee grinder and sift 2-3 times
Whisk the egg whites and castor sugar till it forms a thick aerated meringue, firm but not too dry.
Turn the nut mixture into the bowl, and fold gently to get a lava type batter.
Add this mix into a pipping bag with a plain nozzel and pipe into circles.
If you are using the freeze dried raspberries crumble them up and sprinkle on top of each macarons.
Hold the tray firmly and tap the underside firmly. This should help to spread and smooth out the macarons.
Leave out, uncovered for 15 minutes.
Meanwhile preheat the oven to 150C (the original recipe has 170C).
Bake in preheated oven for about 18 to 20 minutes. They are ready when they readily leave the paper when liften with a palette knife. Remove from oven as soon as this happens, and leave to cool completely.
I take out the macaron shells when I take them out from the oven, and I do this trick always, splash a little bit of water under the baking paper which allows the Macaron to lift from the baking paper easily.

For the Butter Cream

200 gm cream cheese ( room temperature)
1 egg yolk
60 gm fine sugar
1 tbsp of vanilla extraxt
125 gm soft butter
Raspberries for keeping inbetween the macarons.

Add the egg yolk and the sugar and the vanilla extract in a bowl and whisk using a hand mixer till the mix is fluffy and light colored.
Add the butter little by little and whisk till it is creamy/
Add the cream cheese to this and stir it well using a wooden spoon till the mix is fluffy and creamy.

Sandwich the macarons with the cream cheese filling and also donn't forget to keep a raspberry inside the filling .


Tuesday 24 June 2014

Beef meatballs with broad beans and lemon


I am planning to do few post this week, atleast that is what my sister has asked me to do.
Hans is gone from tommorow for  a concert trip and he will be only back Monday evening.
So sis was like he is not home you should post then more in this week.

But knowing me I will be not doing, as I have already told Hans when he is not home I am not going to cook anything at all :-)
And he remarked I can be like the old lady who live above us in the apartment, when her husband was in the hospital for few weeks she hardly cooked.

By now you all know I am crazy for the cooking style or recipes of Yotam Ottolenghi .
And if you are not convinced you can check out all these post Chermoula Aubergine, Acharuli Khachapuri and I am sur eyou will find more similar dishes in my blog.

I made this dish when I did a Ottolenghi evening here at home together with the chermoula aubergine when i did a ottolenghi evening here at home.


This is what it is written in the book about the recipe and I must say I totally agree to it.

Fresh, sharp and very, very tasty, these meatballs are our idea of the perfect spring supper. Serve them with basmati rice and there isn't much need for anything else. Whole blanched almonds make a good addition, for texture as well as for taste – add them to the pan at the same time as the unshelled broad beans. 

Makes about 20 meatballs, to serve four


4½ tbsp olive oil
350g broad beans, fresh or frozen
4 whole thyme sprigs
6 garlic cloves, sliced
8 spring onions, cut at an angle into 2cm segments
2½ tbsp lemon juice
500ml  chicken stock
Salt and black pepper
For the meatballs
300g minced beef
150g minced lamb
1 medium onion, finely chopped
120g breadcrumbs
2 tbsp each chopped flat-leaf parsley, mint, dill and coriander, plus ½ tbsp extra of each to finish
2 large garlic cloves, crushed
1 tbsp baharat spice mix ( if you don't get this spice mix in the book there is a recipe,look below in this post for the recipe of this spice)
1 tbsp ground cumin
2 tsp capers, chopped
1 egg, beaten
Put all the ingredients for the meatballs in a large bowl. Add three-quarters of a teaspoon of salt and plenty of black pepper, mix with your hands and form into balls about the size of ping-pong balls. Heat a tablespoon of olive oil in an extra-large frying pan for which you have a lid. Sear half the meatballs over a medium heat, turning them until they are brown all over – this will take about five minutes. Remove from the pan, add another half-tablespoon of oil to the pan and cook the other batch of meatballs. Once browned all over, remove these from the pan, too, then wipe it clean with kitchen towel.
While the meatballs are cooking, throw the broad beans into a pot with plenty of salted boiling water and blanch for two minutes. Drain, refresh under cold water, then remove and discard the skins from half the broad beans.
Heat the remaining oil in the meatball pan, add the thyme, garlic and spring onion, and sauté over a medium heat for three minutes. Add the unshelled broad beans, one and a half tablespoons of the lemon juice, 80ml of the stock, a quarter-teaspoon of salt and plenty of black pepper. The beans should be almost covered by liquid. Pop on the lid and cook over a low heat for 10 minutes.
Return the meatballs to the pan, add the remaining stock, cover again and simmer gently for 25 minutes. Taste the sauce and adjust the seasoning. If it is still very runny, remove the lid and reduce a little. Once the meatballs stop cooking, they will soak up a lot of the juices, so make sure there is still plenty of sauce at this point. You can leave the meatballs now, off the heat, until you're ready to serve.
Just before serving, reheat the meatballs and add a little water, if needed, to get enough sauce. Gently stir in the remaining herbs, lemon juice and the shelled broad beans and serve immediately.
Baharat Spice Mix:
1 tsp of black pepper corns
1 tsp cirriander seeds
1 cinnamon stick (5 cm) roughly broken up
1/2 tsp whole cloves
2 tsp cummin seeds
1 tsp cardamom
1/2 nutmeg grated

Add all the ingridients in a spic grinder and powder to a fine powder.
You can keep this spice powder for 2 months in a closed jar.

Friday 20 June 2014

Strawberry & almond cheesecake sponge


There was a time when I always made a cake for Sunday afternoon coffee and I used to take them to my inlaws home and the cake would be finished in a flash as we were always with some 7 for coffee and then If by chance there was some left over she would keep the rest for the next day for them.

If you are a regular reader of my blog you will know that she passed away last year and now for sunday coffee we have gone down from 7 people to just 4 ( ok mostly 3 as Shyama is only there for coffee ifshe come home for weekend)

And mostly we end up buying cake if it is just 3 of us as Hans would be saying to me why you want to do all the work making a cake as we are just 3.
So ususally we end up buying tarts/ cakes these days from the bakers .
And i was fed up paying too much for the small cakes plus they are too sweet etc... and I go on grumbling about it, so I ended up making this cake for one sunday.
And I kept the rest in my FIL's fridge saying he can have a slice for next day and also to give for Niece when she come there.
The cake is really good and moist. And as strawberry season is still going on there it was a good way to use the delicious strawberries.
Mu cheese went to the bottom so next time when i make this cake i will add more than half of the cake batter and then add the cheese mix.


Recipe Copied from BBC Good Good

Ingredients.
  • 175g butter, really soft, plus extra for greasing
  • 250g caster sugar
  • 4 large eggs
  • 200g self-raising flour
  • 50g ground almonds
  • 75g full-fat natural yogurt
  • 2 tsp vanilla extract
  • 250g strawberries, hulled and sliced
  • handful flaked, toasted almonds

For the cheesecake blobs

  • 200g full-fat cream cheese
  • 25g caster sugar
  • 1 large egg
  • Heat oven to 180C/160C fan/gas 4. Grease and line the base and sides of a deep 23cm cake tin with baking parchment. Mix the ingredients for the cheesecake blobs together in a bowl until just combined – be careful not to overmix or it will become runny. Set aside.
  • Put the butter, sugar, eggs, flour, ground almonds, yogurt, vanilla and a pinch of salt in a large bowl, and beat together until smooth using an electric hand whisk.
  • Scrape half the cake mixture into the tin, then scatter with half the strawberries. Use the back of a teaspoon to create dips in the surface of the cake and dollop in spoonfuls of cheesecake mixture – saving about half for the top. Cover with the remaining cake mixture, being careful not to disturb the cheesecake and strawberries below. Scatter with the remaining strawberries and spoon on the remaining cheesecake mixture, using the same method as before.
  • Scatter with almonds and bake for 50 mins-1 hr or until a skewer comes out clean. Cool for 20 mins in the tin before turning out. Delicious served warm or cold

Friday 13 June 2014

Hawaiian Rolls


The first time I had Hawaiian bread was when I visited my sister in Houston in 2012 , we were in this supermarket and sis said to me Finla these breads are so soft a bit like our Kerala bakery bread and she bought a pack.
Of course her son Vishal love these bread too that he and I ended up eating ( Hogging) the whole lot.
So I have been wanting to make these bread from the time when I came back . And was looking for a good recipe.

The moment I saw this recipe in this blog Milk and Honey I knew I was going to make this Hawaiian Rolls as they were looking super soft and so delicious.


And must say they were really so so good.
If i could I would have eaten in one go more than I had ate :-) if I had ate more I think I would have also had to do running and squats like she does, and I do really wish I did so I could eat more of these delicious bread.
The recipe I have given is from her place and I have written what I changes, actually didn't change that much.
I think the bread is eaten the best the day itself of making them.

You should check out Milk and Honey blog , she has so much delicious dishes that I am sure I will be visiting her place to make few other dishes from her place.


How to make them.


Recipe Copied from Milk and Honey

Sweet Buns - aka Hawaiian Rolls

500g "00" flour (a little more or a little less) and some for dusting on the work surface ( Use White bread flour)
1 large egg
250ml pineapple juice, room temperature
1/4 cup caster sugar
1/4 teaspoon finely grated fresh ginger ( I added more grated ginger)
1 scant teaspoon fine sea salt
7g (1 sachet) dried yeast
60g unsalted butter, melted
Egg wash - (1 egg beaten with 1 tablespoon of water)
30g unsalted butter, melted for brushing

Grease a 20 x 30 baking pan. Set aside.

In a medium bowl, beat the eggs, pineapple juice, sugar, ginger, vanilla and melted butter. Set aside.

In the bowl of an electric mixer fitted with a dough hook, dump in about half the flour (no need to measure, just eyeball it) and the salt. Add the egg mixture and mix on low until roughly incorporated. Sprinkle in the yeast and mix. Add the remaining flour and mix until you have a slightly tacky dough. If it's too wet, add a little more flour a tablespoon at a time. Scrape the dough into a lightly oiled bowl and cover. Leave to double in size for about an hour. (Mine took almost one and half hour to double up)

Scrape the dough onto a lightly floured work surface and knead briefly. Add more flour if the dough if it's too sticky, but only enough to make it manageable. Divide the dough into 15 even portions. Roll the portions into balls and place them in the baking tray. Cover and leave them to double in bulk for another hour or so.

Preheat the oven to 180 C.

Brush the tops of the balls with egg wash and bake for 25 - 30 minutes until golden brown. Brush tops with melted butter and serve warm
Sending the Delicious super soft bread to Yeastspotting