Tuesday 29 January 2013

Individual Raspberry-Jam Cakes

By the end of every year we buy a calendar for the commng here. And you will be surprised when you hear we hang them.
I don't think I have evern seen this in any body else home than ours :-) well it is in the WC we hang the calendar. Now I am sure you all be having a good laugh thinking about hanging a calandar in WC.

Well come on isn't that really effective everybody goes every day few times to visit this room and as our wc is small you can't miss the calandar, it just stare right at you.

And all three of us write what ever has to be done, so Hans would write if he has a concert to perfom, or a special rehersal he has to go etc.... shyama when she was in school she used to write what special happening wers going on, now that she is in college she just writes when her exams are.

And me write down, when the dentist/doctors apointments, which weekend we have guests, or we even write down the place if we are planning to go to a city on the weekend we also write down the Birthdays of the family from here and b'day of my family in India .
That is how we keep up with all the dates, and what is going on etc...

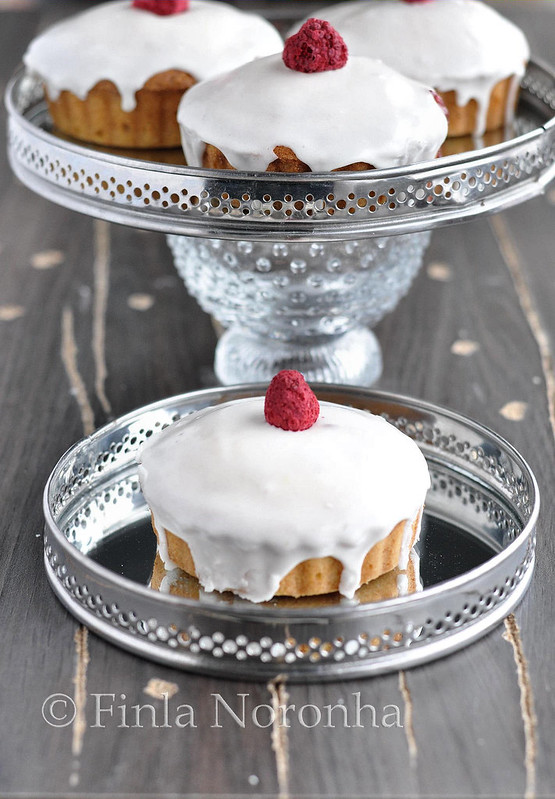
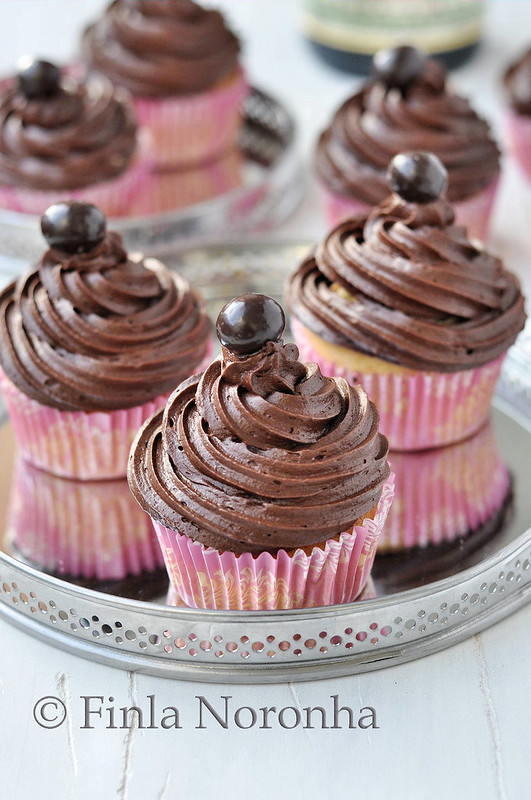
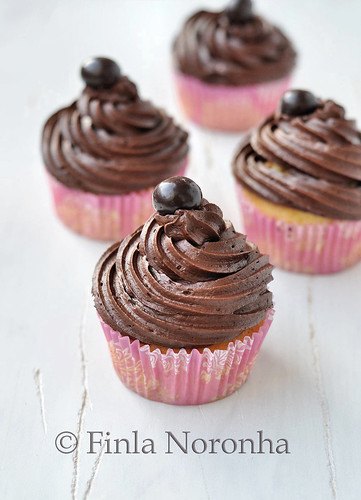
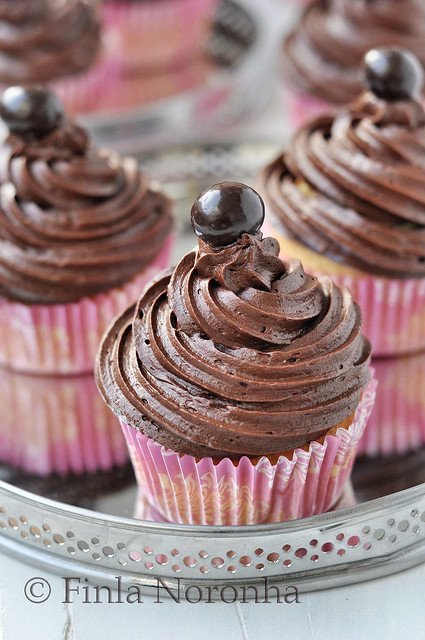
So mostly I buy a calandar from a Dutch artist with birds and seasons etc.... but this year I wanted to have something different , so what do I end up buying a Matha Stewart Cupcake Calandar and ofcourse I promise dmyself I should try everymonth one recipe .
Ofcourse this is not January recipe from the calandar, but I liked this recipe and I thought why not try this, didn't matter which one I tried as long as it is from the calandar.


Make 6 ( I got 5 )
115 g unslated butter, room temperature, plus more for tin
170 gm sugar ( I only added 90 gm )
1 teaspoon of finley grated orange zest
2 large eggs seperated
180 gm all purpouse flour1/2 tsp baking powder
1/2 tsp salt
60 ml milk
6 tablespoon of Raspberry jam

For the glaze.
180 gm of powder sugar
1/4 cup freshly squeezed juice
( I did use this recipe, as i wanted to have a thick glace I just added the power sugar with 2 tablespoon of egg white into a bowl and mixed it with a bit of orange juice as needed to make the thick glace)
Direction.
1. Preheat the oven ti 175°c.
Butter a standard muffin tin, set aside ( I didn't have them so I used a another kind of pan).
In a medium bowl, beat butter, sugar, and zest untill light and fluffy.
Beat the eggy yolk one at a time, untill creamy, set aside.
Into a small bowl, sift together flour, baking powder and salt.
Add flour mixture and milk in alternating batches to butter mixture, set aside.

2. In a clean bowl, whisk egg whites to soft peaks, fold into batter.
Divide half of batter among the muffin cups. Make an indentation in the middle of each, fill with 1 tablspoon of jam.
Top with remaining beter.
3. Bake intill the cake tester inserted in top cake layer comes out clean, about 30 minutes ( mine was baked iin 23 minutes)
Unmould the cakes, and transfer them to a wire rack to cool.
I, a small bowl, whisk together the powdered sugar and juice.
Place rack over a plate / or parchment paper , frizzle cake with gaze.
As i mentioned above I didn't use this glaze i used a thicker glaze.

Tip take care when you add the jam don't add too much, it will over flow when it bakes.
I would really use less sugar as the jam is sweet plus there is the sugar glaze.
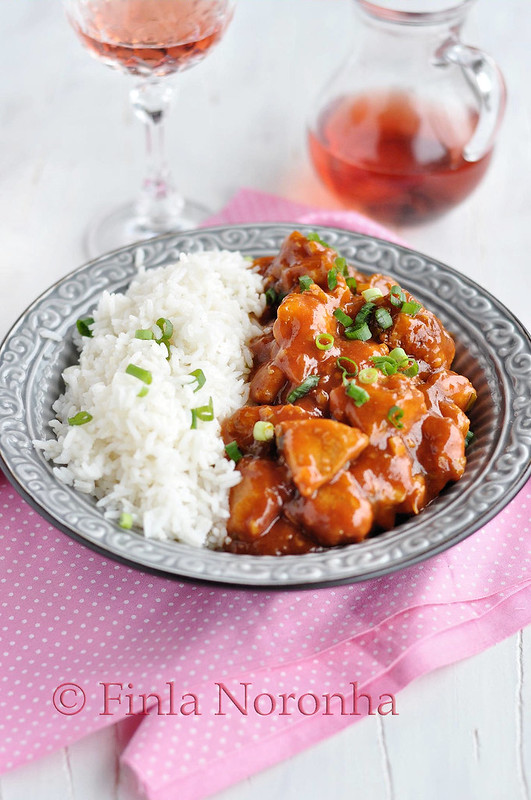
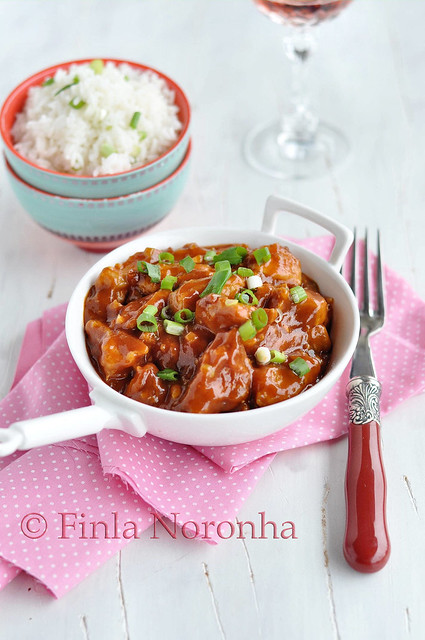
We all loved the cake, i will be making them again with different filling and glaze.


Thursday 24 January 2013

Herb & Cheese Pull-Apart Bread

In the begning od year when Aparna mentioned in Facebook that she likes to bake bread and she have so many variety of breads she wanted to make and if  intrested we can join her for making a new bread every month for a year.
Ofcourse when I read her staus I was intrested, I do make bread here at home every few days ( spelt bread) as we have twice a bread here, morning and evening, but I think if you koin up with other people it is extra motivation to make new and ther variety of breads.
So lot is us crazy , enthusastic women joined up and Aparna made a fb group and she gave it a perfect name We Kneed to Bake.
So here we are with our first bread of this year.

Aparna decided this month on Herb & Cheese Pull-Apart Bread. She told we can use our own filling etc... I followed the dough recipe which Aparna gave and added egg and onions to it, i have written them in color.
In a way you dodn't have to follow the filling ingridients as you can use what ever filling you want.
I have seen this bread in blogs but never thought of making them ( that is the best thing of joining he group you make new breads or one you have seen but don't have the motivation to make)
I made in two small loaf tin, you can make one bread but then in a bigger loaf tin.

Here at home we loved the bread, the day when I made I ate four slices so youc an imagine how delicious the bread is, actually if i could I would eat the whole bread. I took one bread to my in laws place and they also loved it especially with their soup in the evening.

Ingredients:   
For the Dough: 
1/2 cup warm milk
1 tsp sugar
2 tsp active dry yeast
2 3/4 to 3 cups all-purpose flour ( I used white bread flour)
1 table spoon of dried onions
1 tsp salt
25gm butter, soft at room temperature
3/4 to 1 tsp garlic paste
3/4 cup milk (+ a couple of tbsp to brush over the bread) ( I added less milk as I added 1 egg)
Click on the pic for a enlarged photo

For the Filling:
15 to 20gm melted butter
3 tablespoon of fresh parsley chopped)
2 tablespoon chives chopped
1 tsp spoon of dried herb mix
1/2 cup grated cheddar cheese (3/4 cup )
2 table spoon of fried onions

Method: As almost always, I used my food processor but you may knead the dough by hand.
In a small bowl, dissolve the sugar and the yeast in the 1/2 cup of warm milk.
Keep aside forabout 5 minutes till the yeast mixture bubbles up.
Put 2 3/4 cup of flour, salt, softened butter, and garlic paste and the dired onions in the food processor bowl (or alarge bowl) and pulse a couple of times to mix.
Then add the yeast mixture andthe 3/4 cup  ( as I mentioned I didn't add the full 3/4 milk as I added one egg to the mix) of milk and knead till you have a soft, smooth and elastic/ pliabledough which is not sticky.
Add a little extra flour if your dough is sticking,but only just as much as is necessary.
Shape the dough into a ball and place it in a well-oiled bowl, turning the dough to coat itcompletely with oil. Cover and let it rise for about 1 to 1 1/2 hours or untilalmost double in volume.
Dust your work surface lightly with flour.
Deflate the dough, shape it into a square and rollthe dough out into a larger square that is about 12’ by 12”.
 Brush the surfaceof the square with the melted butter.
Evenly sprinkle the herbs, pepper/ chilliflakes and the cumin seeds and then the grated cheese. Use a rolling pin to verylightly press the topping into the dough to ensure the topping doesn’t fall offwhen you are stacking the strips
.Using a pizza cutter, slice the dough from top to bottom into 6 long and even strips – they do nothave to be perfect. Lay each strip on top of the next, with the topping facingupwards, until you have a stack of the strips
 You can put the 2 strips cut from the sides in the middle of the stack so it looks neater. Usinga pastry scraper or a sharp knife, cut straight down through the stack dividingit into 6 equal pieces (6 square stacks).
Grease and lightly flour a 9” by 4” (or 5”) loaf tin. Butter and lightly flour a 9 x 5 loaf pan. Layerthe square slices, cut sides down into the loaf tin
Cover the loaf tin dough with a towel and allow the dough to rise for an hour. Lightly brush some milk over the top of the loaf .
 Bake the dough at 180C (350F) for about 30 to 40 minutes until it is done and the top is goldenbrown. This recipe bakes one 9” by 5” loaf..
Sending this to Yeastspotting

Sunday 20 January 2013

Chicken With Capsicum

If you don't have that much time to prepare a warm meal and you don't want to eat junk food then this is a chicken dish you can whipp up really fast.
I think sometimes it takes longer to slice the chicken and the capsicum etc than making the dish it self.
Plus as the dish is not spicy ( only spicy taste is from the chillie sauce, so if you have young kids or people who don't like spicy food will love this.
If you want to have a dry dish then don't add a lot of stock and if you want to have more sauce for the dish add more chicken stock. But then add a bit more Kecap Manis.
You can serve this chicken dish with rice or noodle it is you choice.

Ingridients:
Chicken breast thinly sliced 500 gm
2 table spoon of oil
2 spring onions slice plus extra for garnishing
1 garlic clove chopped fine
1 small piece of ginger finley chopped
1 tsp of soy sauce
I big red capsicum sliced
1 tbsp rice wine vinegar or if you don't have use normal white vinegar
2 to 3 table spoon of Kecap Manis
1 tbsp of honey
200 to 250 ml chicken stock
1 tbsp of spicy chillie sauce.
1 to 2 tbsp of corn flour miced with a little bit of water
Salt and pepper to taste.

Heat the oil in a wok / pan add the onions, ginger and garlic and fry for few minutes or till they are soft, then add the chicken pieces and the soy sauce fry for few minutes, add the kecap Manis and the capsicum and chillie sauce,honey and vinegar and fry for another few more minutes, the chicken won't take that long to cook as they are thinly sliced.
Add the stock bring every thing to boil, add pepper and salt ( take care with the salt as soy sauce and the kecap Manis is salty)
Add the cron flour mix and make the sauce thick, sprinkle with spring onions and serve with rice of noodles.
If you think your sauce is too watery add a bit more of the corn starch mix to make it thicker.


Wednesday 16 January 2013

Creamy Pasta With Salmon and Chives

In my laast post which was Fresh home made pasta I had mentioned my next post will be what I have made with the delicuous home made pasta.
Well one of the dishes I made with them is this super creamy delicious pasta dish with salmon.
Ok I have made something else too, but that will be for the next post :-)

I think making this salmon dishe with fresh pasta made it double delicious.
In my pasta book it was written as the fresh pasta don't swell up you need to use 125 gm pasta per person.

Ingridients.

2 table spoon of olive oil
1 big onion finley chopped
2 tabls spoon of tomato paste
1 big garlic cloves choppes very fine or into paste
2 tbsp of sun dried tomatoes in oil thinly sliced. ( I use my home made ones )
100 ml Dry Vermouth ( if you don't have this you can use good white wine)
200 ml cream
100 ml fish / chicken stock
400 gm fresh pasta ( of course you can use dry ones)
200 gm fresh salmon diced
3 table spoon of chopped chives
Salt and peper to taste

Heat the oil in pan add the onions and fry till golden brown.
Add the tomato paste and garlic, fry for few minutes make sure you do'nt burn them.
Add the vermouth ( be carfull) stir, then add the stock, cook for few minutes.
Add the sun dried tomatoes, cream, parsely, pepper and salt to taste. Add the salmon pieces as they are cut into small pieces it will only take a minute or two to cook and any way it will continue to cook when you add the cooked pasta.

In the mean time boil water in a big pan and cook the pasta, if it is fresh pasta it will only take 3 minutes to cook, and if you are using dry pasta cook according to the instruction in the packet.
When the pasta is cooked drain and add to the pan with the sauce and mix everything good and serve with a sprinkle of chives and if you want you can slice extra sun dired tomatoes and add .
 

Monday 14 January 2013

Pasta With Eggs / Pasta all'Uovo / Pasta Dough

I have nevee been for a Cooking or a Baking lesson. I always think maybe I should gor for a lesson to learn something new, but them I say to myself, all this years I have been cooking and baking without going for a lesson ( ofcourse I do have a large collection of cooking and baking books)
But then in last November, in the cutlural center in my town ( we call that as there are halls for concerts, for dancing lessons, a good library, they give lessons and talks about different subjects) and every year we get a fat book with all the things they are doing in the year. So when I saw they were giving a Master Class in Pasta, I said to hans I might go and join in , hans ofcourse was delighted, he loves when I do all these things as he say if you want to do something do it hen regretting later that you didn't get a chance or tme to do.
So I went early to book my place as they only have 14 places.
And i had such a good time, it was a 4 hour course in the evening and I had so much fun there making pasta from the scratch and we did 8 different dishes and we also ate all 8 dishes and I came back home after 11 in the evening complaining to Hans how stuffed I am :-)

So as a New years gift I got a pasta making machine for my Kitchen.

And I have been hooked, I have been trying fresh pastas , ravioli etc....and I am just loving it well we all are loving it .
I must say I love dry pasta as I have been eating them for the last 22 years ( had my first pasta when I came here) and I am sure I will still use dry pasta in my kitchen a lot.
But have to say nothing can match the delicious taste of frshly made pasta it is just so so good.

Fresh pasta is usually locally made with fresh ingredients.
 Fresh pasta is usually made with a mixture of eggs and all-purpose flour or “00” high gluten flour. Since it contains eggs, it is more tender compared to dried pasta and only takes about half the time to cook.
 Delicate sauces are preferred for fresh pasta in order to let the pasta take front stage.

 Fresh pastas do not expand in size after cooking; therefore, one and a half pounds of pasta are needed to serve 4 people generously.
 Fresh egg pasta is generally cut into strands of various widths and thicknesses depending on which pasta is to be made (e.g. fettuccine, pappardelle, and lasagne).
It is best served with meat, cheese, or vegetables to create ravioli, tortellini, and cannelloni.
Fresh egg pasta is well known in the Piedmont area near the border of France.
In this area, dough is only made out of egg yolk and flour resulting in a very refined flavour and texture.
This pasta is often served simply with butter sauce and thinly sliced truffles that are native to this region.
In other areas such as Apulia fresh pasta can be made without eggs.


Pasta is a type of noodle and is a staple food of traditional Italian cuisine, with the first reference dating to 1154.
 It is also commonly used to refer to the variety of pasta dishes.
Typically pasta is made from an unleavened dough of a durum wheat flour mixed with water and formed into sheets or various shapes, then cooked and served in any number of dishes. It can be made with flour from other cereals or grains, and eggs may be used instead of water. Pastas may be divided into two broad categories, dried (pasta secca) and fresh (pasta fresca). Chicken eggs frequently dominate as the source of the liquid component in fresh pasta.
Fresh pasta was traditionally produced by hand, sometimes with the aid of simple machines,

Since the time of Cato, basic pasta dough has been made mostly of wheat flour or semolina, with durum wheat used predominantely in the South of Italy and soft wheat in the North.


Ingridients.
300 gm Italian pasta flour 00
3 eggs
1 tsp of salt

Add the flour into a working table, with your hands make a well in the middle, add the eggs, and salt.
I use a fork to mix the egg and flour in the begning, Make cirlce movements, till almost all the egg mixture is mixes and then use your hand to make a dough.
You do have to use a little muscle power to make the dough, till you get a smooth dough.
Keep the doung covered in a plastic wraper and rest it to half hour.
After half hour the dough is ready to make what ever pasta shape you want to make.

Use the abpove dough for making fresh pasta, just read your manual in your pasta machine.
You should start from the highest number ( my pasta machine has 6 numbers) .
You cut a portion from the dough, make it flat and square shape ( spinrinkle with some flour) and trun them through the roller in your machine in the highest number you got.
Fold this dough which is comming out flat in two and roll them again with the second highest number. Don't forget to sprinkle with a bit of flour each time.
Fold the dough again and do the same.
After this you don't have to gold them just roll the dough in the next number and then the next till you get to the number one and roll for the last time.
Hang the pasta ( I use a cloth hanger) and while this is drying repeat the smae method with the rest of the pasta dough.
Now when all the dough is done, you are ready to cut into what ever shape you want. Start cutting the dough which you made first.

Cut the dough , sprinkle with some flour and leave it to fry for some 10 minutes and then they are ready to use for cooking.4

For each 100 gm of pasta flour you have to use 1 whole egg ( I tried to use less eggs and it didn't work) Make sure you use very fresh eggs.
Don't take any shor cuts, if you are making fresh pasta you have to have time making the dough and resting the dough etc...
If you are making fresh pasta you can cut according to the shapes and then keep in a plate sprinkles with pasat flour and cover it well with plastic foil in you kitchen counter and you can use them next say. I tried this and it works perfect , I dont know If it will cork if you keep in the fridge.

Make sure you are back here as I am going to share with you all what I made with this fresh Home Made pasta.


Thursday 10 January 2013

Shrimp Croquette / Garnalen kroketten


Belgium is really famous for a variety of Croquettes / Kroketten.
One of the most famous one will be Aardappel kroketten / Potato crouquettes, are often served as a side dish. Then there is Kaas kroketten / Cheese croquettes which i super yumm, and then there is this Shrimp / Garnalen crouquettes which is made with grey shrimps and as we live near to the North sea ther eis always fresh grey shrimps available through  my MIL's sister as she knows a fishermen and she gets really fresh grey shrimps for us when it is available.

These Shrimp crouquettes are really famous, you will see pre maid ones in the fish monkers, in the super market in the deepfreeze section and not to mention in almost every restaraunt here.
And it is always ate as a starter with a green salade and deep fried parsley on the side.

ofcourse these days if you buy from the shops, they ask so much money but when you eat them one will be like one really has to look if there is shrimps in them, so I tend to make them at home.
I know if someone would have told me I will be making them at home when I cam here years ago I would have declared them crazy :-)


 Shrimp Croguettes: You will get +/- 10 croguettes.

3 Shallots finley chopped
60 gm butter
60 gm flour
300 ml chicken stock
pinch of nutmeg
Salt and peper to taste
200 gm grey shrimps
2 eggs beaten
Few tabls spoon of flour
Bread crumbs to coat the croguettes ( +/- 1 cup)
Oil for deepfrying
Curly parsly for frying

Heat the butter in a pan and add the shalots and fry in the butter softly don't  +/- 3 minutes.
Add the flour and keep on stirring fro 2 minutes just to cook the flour.
Add half of the stock and stirr continiously till it starts to get thick, then add the rest of the stock and bring everything to boil. Take care that you don't burn everything you will have to stir continiously. This will take few minutes, when you see th emixture is really thick then off the fire and add the nutmeg,salt and pepper and give it a good stir. Then add the shrimps. Mix everything carfully.
Pour this mixture into a shallow glass bowl. Smooth the top and keep this in the fridge for 1 1/2 hours.
Divide the mix into ten portion shape them like you see in the picture. ( While I shape them I add a drop of oil in my hands so that the mixture doesn't stick to my hands)

Take a crouquett and roll them in the flour, removing the exceess flour then coat them nicely with the egg and then roll them with the bread crumbs. Make sure bread crumbs are coated evenly. Repeat with the rest of the croquettes.
Heat the oil to 180°c  and fry the croguettes till they are golden brown.
Deep fry the parsly .
Serve with a green salade with the fried croquettes and fried parsley with a wedge of lemon/lime.

I some times make them the evening before and then use the next day, especially when I am making it for a party. I keep them in a tupperware in layers.


Tuesday 8 January 2013

Vanilla Cup Cake With Baileys Frosting

A hour ago came back home from the train station after saying bye to Shyama, she has been home for the last 2 weeks for the holiday not that she had that much holiday as she was revising for her exams as colleges here in Belgium have exams after the holiday, which is a bumer for the kids as during the holiday they have to learn, plust point they can use the holiday for studying so guess it is a win win situation.
 
Of course if you have her for 2 weeks then one is so used to the routine if having her at home that I am totally lost after comming home, I cleaned up her room then cleaned up some plates and cups after the dinner we had before she left. And then to take my mind of I am sitting here and writting the post here.
It is a two hour train ride  ( long if you think as Belgium is a small country) not long at all if you think about how much every body have to travel as it is such a huge country.
She has to walk to her place some 15 minutes, so I am always waiting for her to ring me here at home when she get to her place.
Some might think why worry, but I am always happy to hear the phone riniging and when I hear a voice on the other side saying me she is in her place.
I am only worried as it is in the evening she leave, if it is during the day I wouldn't.
One must think one will be so used to her leaving now as when the college is there she comes home every weekend and goes back every sunday evening.
But I guess moms always worry .


Original Cupcake recipe id from Joy of baking

Vanilla Cupcakes:
1/2 cup (113 grams) unsalted butter, room temperature
2/3 cup (130 grams) granulated white sugar ( I added 70 gm)
3 large eggs
1 teaspoon pure vanilla extract
1 1/2 cups (195 grams) all purpose flour
1 1/2 teaspoons baking powder
1/4 teaspoon salt
1/4 cup (60 ml milk)

 Vanilla Cupcakes: Preheat oven to 350 degrees F (177 degrees C) and line 12 muffin cups with paper liners.

In the bowl of your electric mixer, or with a hand mixer, beat the butter and sugar until light and fluffy. Add the eggs, one at a time, beating well after each addition. Beat in the vanilla extract.

In a separate bowl whisk together the lemon zest, flour, baking powder, and salt.

With the mixer on low speed, alternately add the flour mixture and milk, in three additions, beginning and ending with the flour. Scrape down the sides of the bowl as needed.

Evenly fill the muffin cups with the batter and bake for about 17 - 20 minutes or just until set and a toothpick inserted into a cupcake comes out clean. (Always check a few minutes before the stated baking time. Do not over bake or the cupcakes will be dry.) Remove from oven and place on a wire rack to cool

Original recipe here

CHOCOLATE FROSTING:
Melt 1 stick (1/2 cup) butter or margarine; stir in 2/3 cup HERSHEY'S Cocoa. Add 3 cups powdered sugar alternately with 1/3 cup milk and 1 teaspoon vanilla extract beating to spreading consistency. About 2 cups frosting.

I added less milk and added couple of tablspoon of bailey's.


Friday 4 January 2013

General Tso's chicken

First time I had this Chicken dish was when I went to visit my sis in Houston, we had gone to this chinese place for a buffet and if I am honest I have never ever seen such a huge buffet, they had so many variety of dishes, I didn't know were to start.
My sister did warn me, that the place will have a lot of dishes but I didn't expect to see so many.
Actually I didn't know what to eat, so I temeber eating loads of those baby fried crabs then some other dishes but I also took this chicken dish as it was written that it is a spicy dish.
So as usual I try to recreate the dish at home as I know Hans and Shyama will love it too.
So I went hunting for recipes on the net and this is what I ended up making using a mix of recipes, taking a bit from one, then a littil bit from another recipe etc....
It is such a yumm dish and not that difficult to make them too.


General Tso's chicken (sometimes Governor Tso's chicken, General Gau's chicken, General Tao's chicken, General Tsao's chicken, General Tang's chicken or simply General's Chicken) is a sweet, slightly spicy, deep-fried chicken dish that is popularly served in North American Chinese restaurants.
The dish was unknown in China and other lands home to the Chinese diaspora before it was introduced by chefs returning from the United States.
 The dish is named after General Tso Tsung-tang, or Zuo Zongtang, a Qing dynasty general and statesman, although the connection is tenuous. He is said to have enjoyed it, and perhaps helped create a dish, but there are no recorded recipes.


The food has been associated with the name of Zuo Zongtang (左宗棠, 1812–1885), a Qing Dynasty general from Hunan.
Zuo himself could not have eaten the dish as it is today, and the dish is neither found in Changsha, the capital of Hunan, nor in Xiangyin, the home of General Tso. Moreover, descendants of General Tso still living in Xiangyin, when interviewed, say that they have never heard of such a dish.

There are several stories concerning the origin of the dish. Eileen Yin-Fei Lo states in her book The Chinese Kitchen that the dish originates from a simple Hunan chicken dish, and that the reference to "Zongtang" was not a reference to Zuo Zongtang's given name, but rather a reference to the homonym "zongtang", meaning "ancestral meeting hall."
Consistent with this interpretation, the dish name is sometimes (but considerably less commonly) found in Chinese as "Zuo ancestral hall chicken

General Tso's Chicken.

Marination.
600 gm Chicken breast cut in bite size pieces
2 tablespoon Soy Sauce
1 egg
2 heap table spoon of corn flour
1 tsp pepper powder
Mix above ingridients in a bowl and set aside foe half hour.

For the Sauce:
350 ml of chicken stock ( We love the sauce and if you want a drier dish add less stock)
2 tbsp of rice vinegar
3 tablespoon tomato paste
2 table spoon of soy sauce
1 tablespoon of dark soy sauce ( if you dodn''t have you can use normal soysauce)
1 tablespoon of Hoisin Sauce
1 heap tablespoon of Sriracha
Mix all the ingridients in a bowl and keep aside.

2 to 3 tablespoon of corn flour mixed with a little water.

1 medium size onion chopped
2 spring onion chopped
1 tablespoon fresh ginger finley chopped
1 tablespoon garlic finley chopped
5 to 6 fresh chillies chopped
1 tablespoon of seasame oil
Oil for deepfrying the chicken, ( Use the oil according how big pan / wok you are using to deep fry the chicken.
2 tablespoon of vegetable oil
Spring onions for garnish.

Heat the oil in a wok for deep frying. When the oil is hot, deep fry the marinated chicken pieces in two batches till they are golden brown , drain to a Kitchen paper and keep it aside.

Heat another wok ( or clean the wok you used for deep frying and then use the same wok) .
Add the 2 tbsp of oil , when the oil is hot add the onions,spring onions,ginger,garlic and chillie and fry for few minutes till they are soft.
Now Pour the Sauce Mix and bring it to boil, boil for few 3 to 4 minutes, add the fried chicken pieces, and thicken up the whole dish with the corn flour mix.
Don't add the whol corn flour mix at once, add three quaters and if the thickness is good then dodn't add the rest. You have to make the chicken dish thick according to your liking.
After adding the corn flour mix, cook for 2 minutes and serve with rice or noodles.
I do have step by step pics but i can't add pics to my blog, the pictures I added was with my flickr account. So will upload the pics later.


Tuesday 1 January 2013

The Softest Challah

I thought as I love baking bread, why not do a bread post for starting the New year of Blogging.
Wishing all my friends and lovely blog readers A VERY HAPPY NEW YEAR
Hope every one had a wonderful start of the new year.
We any way started with a bang. Went to my inlaws place for New years eve party which was so fun and the food was so delicious too. A good way to start the year I think with good good and drinks and lot of laughter.

I made this Challah in December thankx to my elder sister.
One day she excitedly rang me and told me what she is making in her kitchen and then after a while she rang me and saif the challah is kept for rising.
Then she phoned again very happy to tell me how good they are looking and next day she rang me to say how DELICIOUS they were and that she was busy making two more challah to give to her friends and she was so much in praise of the recipe, and the only thing I heard for next few days from her is how the bread is so good and that she made atleast 6 if them to give as presents for her friends, so in the end I ended up making them too.
 
And I must admit I am so glad that I ended up making them as this is the best challah I have ever made and I must say I have tried few recipes in the last years and to be honest I will not be changing into any other recipe, this is going to be the recipe I will be using always.
The bread is so so soft that if I could I would eat half in a go.

This is the best Challah I have made and the recipe I got from The Kitch here
You should go and check there, the recipe is so clear and I loved the step  by step pictures which is elaboratley done.


Ingredients
2 teaspoons active dry or instant yeast
1 cup (8 ounces) lukewarm water
4 - 4 1/2 cups (20 - 22 ounces) all-purpose flour
1/4 cup (1 3/4 ounces) white granulated sugar
2 teaspoons salt
2 large eggs
1 large egg yolk (reserve the white for the egg wash)
1/4 cup (2 ounces) neutral-flavored vegetable oil

Instructions

 Sprinkle the yeast over the water in a small bowl, and add a healthy pinch of sugar. Stir to dissolve the yeast and let stand until you see a thin frothy layer across the top. This means that the yeast is active and ready to use. (If you do not see this or if your yeast won't dissolve, it has likely expired and you'll need to purchase new yeast.)
 
Whisk together 4 cups of the flour, sugar, and salt in the bowl of a standing mixer (or in a large mixing bowl if kneading by hand).
 Make a well in the center of the flour and add the eggs, egg yolk, and oil. Whisk these together to form a slurry, pulling in a little flour from the sides of the bowl.
 Pour the yeast mixture over the egg slurry. Mix the yeast, eggs, and flour with a long-handled spoon until you form a shaggy dough that is difficult to mix.
With a dough hook attachment, knead the dough on low speed for 6-8 minutes. (Alternatively, turn out the dough onto a floured work surface and knead by hand for about 10 minutes.) If the dough seems very sticky, add flour a teaspoon at a time until it feels tacky, but no longer like bubblegum. The dough has finished kneading when it is soft, smooth, and holds a ball-shape.
 Place the dough in an oiled bowl, cover with plastic wrap, and place somewhere warm. Let the dough rise until doubled in bulk, 1 1/2 to 2 hours.
 Separate the dough into three or six equal pieces, depending on the type of braid you'd like to do. Roll each piece of dough into a long rope roughly 1-inch thick and 16 inches long. If the ropes shrink as you try to roll them, let them rest for 5 minutes to relax the gluten and then try again.
Gather the ropes and squeeze them together at the very top.
If making a 6-stranded challah, the directions are as she has mentioned in her place , there is step by step pics how to do it
Line a baking sheet with parchment and lift the loaf on top. Sprinkle the loaf with a little flour and drape it with a clean dishcloth. Place the pan somewhere warm and away from drafts and let it rise until puffed and pillowy, about an hour.

 About 20 minutes before baking, heat the oven to 350°F. When ready to bake, whisk the reserved egg white with a tablespoon of water and brush it all over the challah. Be sure to get in the cracks and down the sides of the loaf.

Slide the challah on its baking sheet into the oven and bake for 30-35 minutes, rotating the pan halfway through cooking

Let the challah cool on a cooling rack until just barely warm. Slice and eat.
Sending this DELICIOUS Challah to Yeastspotting