Tuesday 30 July 2013

Falafel -Ta'miya

 
First time I had Falafel or Ta'miya was 6 years ago when we visited Egypt. And I have to admit I fell in love with them when I took the first bite.

We were there for a bit more that 3 weeks and I think we must have had them so many times.
In restraunts, from the street vendour ( i think the best ones were from them) we did a 4 day trip in a Faluka from Aswan to Edfu which was so enjoyable, much better than the Cruise ships trip according to us. We had stop overs in villages, had food there sometimes we got fruits from the villagers and we shared the cookies and chocolates we had with their kids.

And during the lunch / Dinner time the guy who cooked for us in the faluka made these and I think the taste still lingers with us. Could be also the outdoors and beeing on the nile made one super hungry :-)

So while I was in Egypt I did buy a cookbook about food from there, I must say it was difficult to find a book in English aobut their cooking.
This book is written in Arabic, but it is translated to English so I was delighted to get hold of the translated version in one of the book shops there.
It is written by Samia Andennour and the book is called Egyptain Cooking and Other Missdle Eastern recipes.
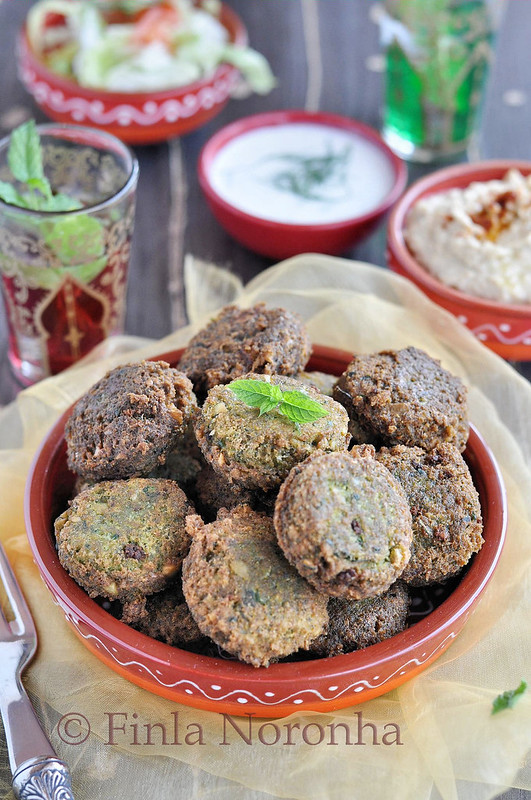
And I have to say these falafels were as good as the ones I ate them there. They were greenish in color insdie, which you get from the green herbs you add into the mix.


Falafel is a deep-fried ball or patty made from ground chickpeas, fava beans or both.
Falafel is a traditional Arab food usually served in a pita, which acts as a pocket, or wrapped in a flatbread known as lafa; "falafel" also frequently refers to a wrapped sandwich that is prepared in this way.
The falafel balls are topped with salads, pickled vegetables, hot sauce, and drizzled with tahini-based sauces.
Falafel balls may also be eaten alone as a snack or served as part of a meze.
Generally accepted to have first been made in Egypt, falafel has become a dish eaten throughout the Middle East. The Copts of Egypt claim to have first made the dish as a replacement for meat during Lent. The fritters are now found around the world as a replacement for meat and as a form of street food. Thankyou Wiki for the info.


Ta'miya - Falafel
500 gm skinned fava beans.
1/4 cup dill leaves
1/4 cup fresh coriander leaves
1/4 cupflat leaf parsley
2 onions
10 garlic ( I used 6 as my garlics were really big)
1 tsp cummin seeds
1 tsp cummin powder
1 1/2 tsp of Sodium bi carbonate
1 to 2 tsp of cayenne pepper
Salt to taste
Cooking oil for shallow frying.

These are the extra things you need if you want to serve them mike i did .
Iceberd Salade
Home Made Hummus
Garlic Sauce
Chilli Sauce
Few slices of tomatoes


Soak the beans over night.
Drain and mince with dill, corriander, parsley,onions , garlic and cummin seeds.
You should not mince to a fine paste, the mix should have a fine crunch.
Add the mix into a bowl and then add the cumming powder, cayenne, soda bi carbonate and salt and give it a good mix . Leave the mix in the fridge for 1 hour.

Heat a pan with oil ( you don't have to deep fry you have to shallow fry)
With a wet spoon or wet fingers, scoop a small and shape into a disc  and shallow fry each side for few minutes.
Oil should not be too hot otherwise you will have a burnt outside and uncooked inside .
Drain them into a kitchen paper.
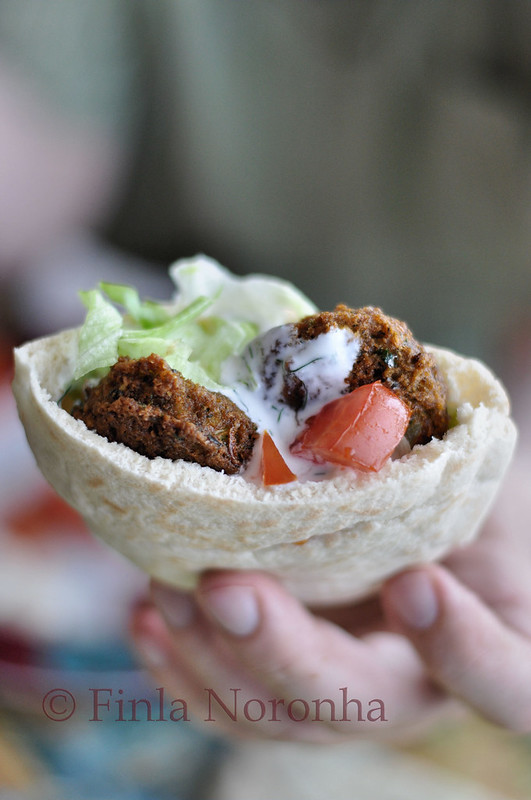
This is how i served them. Heated the pita bread according to the pack and opened up them ( so you have a pocket)  sppread a bit of hummus,added a bit of iceberg salade, garlic sauce, chillie sauce, pieces of tomato and few falafel and then enjoy eating them.

I used a gadget to make the falafel, thanks to Apolina, she and I went to a shopping street and it was like beeing transported to a another world, one woudn't think one was in Brussels as the shops were like the shops we fing in Egypt, Moroco etc.... and while we were in a shop she told me Finle buy this gadget it will be very handy when you make falafel and I am so glad I bought them as it is so easy if you have this gadget.


Saturday 20 July 2013

Greek Pasta Salade

 
At last we have Summer weather here and we are really happy , there are days when it is too hot to go out in the afternoon that was not a problem till now as we have been busy re decorating our living which was lot of work especially emptying the book shelf etc....and then painitng the living.

Even though we live just less than a km from the seaside we have not been to the beach simply because none of us like to lay there in the hot sand for hours and hours like people d here.

When Shyama was younger we used to go often as she loved to play on the beach etc.... now even she don't want to go, so mostly when we go to the beach it will be walking with our bare feet in the luke warm water for km and km.

This Salde is excelent for the sunny weather we are having. Plus point you make this pasta salade and there is so much salade that you eat it for two days so the work is only for one day and the next day you don't hav eno work at all.

I got the idea for this salade from my another passion these days Pintrest :-)

Ingridients:

280 gm pasta of your choice ( not long ones)
175 gm cherry tomatoes quatered.
1 cuumber seed removed and cut in small chunks
100 gm black olives stoned and quatered
200 gm red onions chopped
250 gm feta cheese in chunks

For the Dressing:
1 heap tsp mustard powder
Juice from 1 lime
1/2 cup olive oil
1 tsp dried oregano
1/2 tsp salt
1/2 tsp pepper
1 tsp dried basil leaves
1 tsp dried chilli flakes

Method :
Cook pasta according to the packet (make sure you add plenty of salt to the water your pasta is cooking)  and when the pasta is cooked drain the pasta and wash with cold water and keep in a sieve for draining the water.
In the mean while, add all the ingridients for the dressing in a bowl and mix everything well.
Add the drained pasta into a big glass bowl , add all the rest of the ingridients into the bowl with pasta , pour the dressing into the bowl and mix everything carefully making sure everything is coated . Just take care with the feta cheese as it tends to crumble up easily.
Taste and if there is not enough salt add more to your taste.
Cover the bowl and leave in the fridge for 2 hours before you serve.
Before you serve the pasta just remember to take out the dish from teh fridge in time so that the salade is not too cold.
 

Monday 8 July 2013

Strawberry Cupcakes with Fresh Strawberry frosting


I love eating and making cupcakes. I have always been in love with them.
I know the frosting is sometimes really sweet but then I think what is a cupcake without the frosting as I eat the cupcakes because of the buttercream :-)

As you can see in my blog I have lots of cupcake recipes.
I must say these ones were really so good.
The cupcake itself was really yumm and the frosting , that was just super I think the flavour of the butter cream was so good maybe because of using fresh strawberries that any artificial flavour.

I was in a hurry and then it was only later I realized that the butter cream had to be kept in the fridge. And I didn't had time to keep it so long. But i think I won't do that next time I will do as the recipe said keep the butter cream in the fridge for a hour or two and then pipe them onto the cupcake.


Ingredients

219 gm Selfraising flour
1 tsp of baking powder
A pinch of salt
90 gm Butter
150 gm sugar ( I only added 80 gm sugar)
2 tsp lim juice
Gtrated zest from half a lime
2 eggs
80 ml cream
120 gm white chocolate finley chopped
120 gm strawberries chopped in chunks plus few for garnishing

For Strawberry Buttercream.

120 gm butter in room temperature
500 gm powder sugar
1 tsp of vanilla extract
4 to 6 strawberries

Preheat the oven for 180° c.
Sieve the flour,baking powder and salt in a bowl.
Add the butter and sugar in a another bowl and using a electric hand mixer ,beat till they are pale in color and fluffy.
Add the lime juice and the grated lime zest.
Add the eggs one by one and beat continue to beat.
Add the third from the sieved ingridients and beat /whisk in a higer speed. Add the half of the cream and beat every thing very well. Add the rest of the flour and the cream and beat everything well.
Add the chopped white chocolates and the strawberry chunks and fold everything carfully.
Divide the batter in 12 muffin Case and bake for 18 to 22 minutes ( Just check as it depends on your oven)
When the cupcakes are baked remove them from the pan and leave it to cool.

For the butter cream.

Add the butter into a bowl and beat them with a electric handmixer till they are very smooth.
Add half of the icing sugar and beat everything well.
Add the vanilla extract.
Using a fork mash up the strawberries, add half of them into the butter cream and beat them in a high speed for 3 to 5 minutes.
If you think the butter cream is too thick or dry add a bit more mashed strawberry. (you might not have to use the whole strawberry mash)
Keep the butter cream in the fridge for 1 to 2 hours.
And then pipe them on top of the cooled cupcakes , garnish with a strawberry on top and serve to your family and friends and enjoy.


Sunday 7 July 2013

Baked Yeasted Doughnuts

 
It is simmer holidays here so as one has not regular hours or any routing for doing something I hav enot been visitng my favourtie blogs.
It will continue like this till september,
not visiting blogs regularly , I will come and ceck your posts when ever I have time.
You all know I am in the  Bread baking group started in Facbook by Aparna We Knead to Bake.
And as usual I am late again as this is last month's bread.

I do love Doughnuts if it was not for my expanding body shape I would make them often.
If you are trying a diet or something like this, these baked Doughnuts will be really good as I am sure they ave far less calorie than the fried ones.
But for me I think I would prefer to eat once in a while the real things than these.
They were not bad, they were good, but not as good as the real ones.
These ones are like filled sweet buns.

Baked Yeasted Doughnuts
(Adapted from Lara Ferroni’s Doughnuts)

Ingredients:

1/4 cup superfine sugar
1 cup warm milk (45C/115F)
3/4 tbsp instant yeast (or 1 tbsp active dry yeast)
1/2 tsp salt
2 tsp vanilla extract
1 cup cake flour (or 1tbsp cornstarch + enough all-purpose flour to make up to 1 cup)
1 1/2 to 2 1/2 cups all-purpose flour
100gm cold butter, cut into 1 inch cubes

For the topping:

about 1/2 cup melted butter for brushing
1 cup superfine sugar + 2 tbsp cinnamon (more or less, depending on your taste), mixed together
OR
Glaze of your choice 
AND/ OR
Jam for filling doughnuts

Method:

Using a processor to knead helps but you can do this by hand.
Put the sugar, milk, yeast, salt and vanilla in the processor bowl and pulse to mix well. Add the cake flour and 1 cup of all-purpose flour and process, adding a little more of the flour as necessary till the dough is thick and pulls away from the sides of the bowl.
Now add the butter pieces one at a time and process till there no large chunks of butter are left in the bottom of the bowl. Now add a little more flour until your have a soft, pliable and elastic dough that is most but not overly sticky.

Turn the dough out onto a floured surface and knead gently until the dough no longer sticks to your hands. Shape the dough into a ball and place in a lightly greased large mixing bowl., turning it to coat well. Cover with a damp towel and let it rise till double in volume. This should take about an hour.
Punch down the dough and roll out to a thickness of 1/2" thickness. Cut out doughnuts using a doughnut cutter or whatever you have on hand to cut out 3” diameter with 1” diameter holes. If you’re making doughnuts to fill with jam, then do not cut out the holes. Place the doughnuts and the holes on parchment lined or lightly greased baking sheets, leaving at least 1” space between them.
Re-roll the scraps and cut out more doughnuts. I used the last left over scraps of dough by pinching of bits, rolling them into balls and baking them too.
Let them rise for about 20 minutes or till almost double in size and then bake them at 200C (400F) for about 5 to 10 minutes till they’re done and golden brown. Do not over bake them.
This recipe makes about 12 to 14 doughnuts and holes. 
Take them out of the oven and immediately brush them with the melted butter and then dip them into the cinnamon sugar mixture. If filling the doughnuts with jam, let them cool. Put the jam into a piping bag with a writing nozzle/ tip and press into the doughnut from the side and gently press out the jam into the doughnut till it starts oozing out. Jam doughnuts do not need too much jam to fill them. If glazing your doughnuts, let them cool completely and then dip one side of the doughnut in the glaze of your choice and let it set.
 

Thursday 4 July 2013

A Beautiful Mess - Chocolate-filled Brioche Rolls

Most of you must know about Pintrest and if you are anything like me, then you are ADDICTED to the place and as I am intrested in food my Boards are fully with food.
I had seen this beautiful looking bread there one day and had pinned to my bread board and have been wanting to make them the day I saw them.
But as bread needs time to make and sometimes I don't have that much free time these days it had taken me while to make this beautiful bread which is from Food Diva's Kitchen.
And I must say she has explained it so good and she has this video whcih shows how to shape this bread which I was so happy to watch as it is only after watching the video that I was able to make this beautiful shape. So do go to her place and watch the video as she shows it very well.

I must say the moment the bread was a bit cool to handle I ate and eating them straigt was so delicious. But if you are a sweet person like me then the bread is not that sweet so when I ate for my breakfast next day ( I MW for a minute) I split opend and spread with butter and also jam.
On the other hand Hans thought it I hadn't used chocolate he would have ate with ham or cheese.
I am sure going to make this bread again and maybe try my hand in making a savoury filling too.


Beautifully Messy Chocolate-Filled Brioche Rolls
Ingredients:
250 g (2 cups) all-purpose flour
250 g (2 cups) bread flour
2 eggs
2 teaspoons dried instant yeast
50 g (1.8 oz) butter, melted and cooled
120 g (little more than 1/2 cup) sugar
200 ml (about 3/4 cup) lukewarm milk
1 tablespoon rose water (optional)
50g dark chocolate
Milk, for brushing
Poppy seeds
Melted butter, for brushing

Method:
1. In a large bowl mix the flour, the sugar and the butter. Mix for 5 minutes by hand or with a mixer.
2. Add the eggs and mix for a further 5 minutes. Meanwhile, turn on the oven to 50C/122F and turn it off as soon as it has reached the temperature.
3. Let the yeast dissolve in the warm milk in a small bowl. Add the rosewater to the milk/yeast mixture and then incorporate the mixture, little by little, to the flour/sugar bowl and mix for other 5 minutes. The dough should be now smooth and even. If not, place on a board and mix by hand, eventually adding a little flour. Shape it into a ball.
4. Place the ball back into the big bowl (oil it) and place it uncovered in the oven. Let rest for at least an hour up to a couple of hours. Take the ball out of the oven and divide into 2 equal parts.
5. Roll each portion flat into a rectangular shape, grate some chocolate filling on top and finally roll into a cylinder. Divide each cylinder into 4 parts. Take each part and slice thinly about 1/2cm wide. Pinch the ends together and fold backwards to form a ball shape (refer to video above).
6. Place on parchment paper and leave to rise for another 30 minutes, cover with a clean, damp cloth. Preheat the oven to 180C/375F.
7. Brush milk on top and sprinkle with poppy seeds. Bake in the oven for 15 minutes until tops are golden brown. As soon as they come out of the oven, brush rolls all over with melted butter. Best eaten on the day they are made