Monday 24 September 2012

Marble Cake

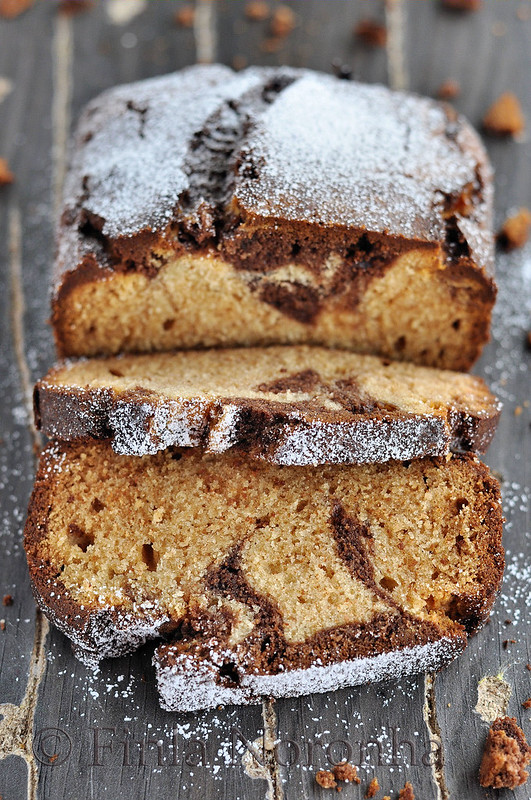
A marble cake is a cake with a streaked or mottled appearance (like marble) achieved by very lightly blending light and dark batter.
 It can be a mixture of vanilla and chocolate cake, in which case it is mainly vanilla, with streaks of chocolate.
Other possibilities are strawberry or other fruit flavors, or (particularly in marbled coffee cakes) cinnamon and/or other spices.


My latest book which I love is How to Bake from Paul HollyWood.
I have been a huge fan of him from the time I saw him in TV shows years ago,
Then the BBC started Geat British Bake Off Series couple of years ago and I must say I just love the fellow.
I have hiw 100 Great Breads, which I love but this How to Bake top all the bread book I have.
If I could I would make every day a new bread or baking from this book, but alas there is no one to eat all the things I make ( atlest if I bake every day)

Normally I use a totally different technic to get the marbel effect which works very well, but he was doing a another trick and I thought why not try it, but I think I was too carfull when I tried what he told i the book that I didn't get a good effect, but It didn't mater as the cake looked beautiful and tasted Delicious.

I used Tagetaste, as my FIL is trying to less is intake if sugar and I thought I will make something for him as he loves sweets but he is not allowed by MIL to have any, ok it is for his own good, so I thought why not use this sugar.
It really works, in the box it was written if a recipe ask 100 gm sugar then just add Half of that is 50 gm Tagatesse.
And if I didn't tell anyone they woudn't even notice that it was not normal sugar in the cake.


So here is the recipe:
200 gm unslated butter , softened
200 gm sugar ( I used 100 gm Tagatesse- sugar replacement)
1 1/2 rsp natural vanilla extract
3 large eggs
250 gm plain flour
3 tsp baking powder
40 ml full fat milk
2 tsp unsweetend cacao powder
Icing sugar for dusting

1. Heat your oven to 180° C. Line a 1 kg loaf tin with the baking parchment.

2. In a large bowl, beat the butter, 180 gm of the sugar and the vanilla extract together intill the mixture is light and fluffy.
Beat in the eggs, one at a time, then sift the flour and the baking powder over the mixture and fold in with 2 tbsp of milk.

3. Spoon two-third of the mixture into the prepared loaf tin , it should be three quaters filled in the tin.
Sift the cacao over the remaining  third of the mixture and fold in, together with teh remaining 20 gm sugar and the last of the milk.

4. Spoon the chocolate mixture over the cake mixture in the tin, then run a fork through both the mixtures, gently swrinling the two together to create a marbel effect.

5. Bake for 55- 70 minutes, untill the cake shrinks slightly from the sides of the tin and a skewer inserted into the center comes out clean.
Remove the cake from the tin and leave it to cool on a wire rack.
Once cooled dust with icing sugar.


Thursday 20 September 2012

String Of Garlic

I don't think there is ever been any time in my home that I have to say, oh I don't have garlic, ( ok i might say I am busy using the last ball of garlic so need to get some more tommorow)
As I use so much garlic in my cooking, we always buy garlic, in a string like you see in the picture.
Ofcourse during the spring and summer time I do buy fresh garlic from the market which I love.

Now it would be a shame if I don't write a little about Garlic as I am posting here this picture.
So thankyou Wiki for the info.
Allium sativum, commonly known as garlic, is a species in the onion genus, Allium. Its close relatives include the onion, shallot, leek, chive, and rakkyo.
 With a history of human use of over 7,000 years, garlic is native to central Asia, and has long been a staple in the Mediterranean region, as well as a frequent seasoning in Asia, Africa, and Europe. It was known to Ancient Egyptians, and has been used for both culinary and medicinal purposes.

Aparnetly according to Wiki India comes second in producers of garlic.
I am not surprised as I remember when I was at home , mom used to add in almost all the dishes garlic.
Culinary uses.

Garlic is widely used around the world for its pungent flavor as a seasoning or condiment.
The garlic plant's bulb is the most commonly used part of the plant.
With the exception of the single clove types, garlic bulbs are normally divided into numerous fleshy sections called cloves. Garlic cloves are used for consumption (raw or cooked) or for medicinal purposes. They have a characteristic pungent, spicy flavor that mellows and sweetens considerably with cooking.
Other parts of the garlic plant are also edible. The leaves and flowers (bulbils) on the head (spathe) are sometimes eaten. They are milder in flavor than the bulbs,[2] and are most often consumed while immature and still tender. Immature garlic is sometimes pulled, rather like a scallion, and sold as "green garlic".
When green garlic is allowed to grow past the "scallion" stage, but not permitted to fully mature, it may produce a garlic "round", a bulb like a boiling onion, but not separated into cloves like a mature bulb.
 Additionally, the immature flower stalks (scapes) of the hardneck and elephant types are sometimes marketed for uses similar to asparagus in stir-fries.
Inedible or rarely eaten parts of the garlic plant include the "skin" and root cluster. The papery, protective layers of "skin" over various parts of the plant are generally discarded during preparation for most culinary uses, though in Korea immature whole heads are sometimes prepared with the tender skins intact.
 The root cluster attached to the basal plate of the bulb is the only part not typically considered palatable in any form.
Garlic is a fundamental component in many or most dishes of various regions, including eastern Asia, South Asia, Southeast Asia, the Middle East, northern Africa, southern Europe, and parts of South and Central America. The flavour varies in intensity and aroma with the different cooking methods. It is often paired with onion, tomato, or ginger.
The parchment-like skin is much like the skin of an onion, and is typically removed before using in raw or cooked form. An alternative is to cut the top off the bulb, coat the cloves by dribbling olive oil (or other oil-based seasoning) over them, and roast them in an oven. Garlic softens and can be extracted from the cloves by squeezing the (root) end of the bulb, or individually by squeezing one end of the clove. In Korea, heads of garlic are fermented at high temperature; the resulting product, called black garlic, is sweet and syrupy, and is now being sold in the United States, United Kingdom and Australia
.
Garlic may be applied to different kinds of bread to create a variety of classic dishes, such as garlic bread, garlic toast, bruschetta, crostini and canapé.
Oils can be flavored with garlic cloves. These infused oils are used to season all categories of vegetables, meats, breads and pasta.

In some cuisines, the young bulbs are pickled for three to six weeks in a mixture of sugar, salt, and spices. In eastern Europe, the shoots are pickled and eaten as an appetizer.
Immature scapes are tender and edible. They are also known as "garlic spears", "stems", or "tops". Scapes generally have a milder taste than the cloves. They are often used in stir frying or braised like asparagus.
Garlic leaves are a popular vegetable in many parts of Asia. The leaves are cut, cleaned, and then stir-fried with eggs, meat, or vegetables.
Mixing garlic with egg yolks and olive oil produces aioli. Garlic, oil, and a chunky base produce skordalia. Blending garlic, almond, oil, and soaked bread produces ajoblanco.
Garlic powder has a different taste from fresh garlic. If used as a substitute for fresh garlic, 1/8 teaspoon of garlic powder is equivalent to one clove of garlic

Thankyou Wiki for the information if you want to know more info, just click the link i have given.
You Might think why suddenly such a intrest in Garlic here.
Well the reason is Aparna of My Diverse Kitchen her blog has Delicious recipes and Beautiful pictures.
She does a Monthly Photography Excersie and this month it is Adding Some Life to Your Photograph this involves taking photographs where food is the main focus of the photograph, with a human element that doesn’t distract from the food.
I have been using Hans hands as a prop for taking pictures for my earings to put in my Flickr account and after using him few times he was like I am not doing this anymore as it seems it makes him nervous when I ask him to do as I will b elike stand still don't shake etc... but then he coudn't complain now as it was not earings it was string of Garlic :-)


Tuesday 18 September 2012

Super Cheese Chicken Burger

Can I call this Chicken Burger or Should I call them Chicken Sandwich that is the confusion when I was writting this post.
From what I read in Wiki
The term "burger", can also be applied to the meat patty on its own, especially in the UK where the term "patty" is rarely used. The term may be prefixed with the type of meat as in "beef burger".

But then in the same article it is written Burgers can also be made with patties made from ingredients other than beef.
For example, a turkey burger uses ground turkey meat, a chicken burger uses ground chicken meat. A buffalo burger uses ground meat from a bison, and an ostrich burger is made from ground seasoned ostrich meat. A deer burger uses ground venison from deer.
So I guess I will Call it Chicken Burger.

Ok Now some of you will indeed think she can call this what ever she want as this really looks super delicious.
And I do agree it was indeed so good.
After making this here at home we were like why should one go for a Burger in Macdonals or  Burger King etc.... they are so easy to make and atleast one knows what is inside the mix as you made them yourself.
Not that I am telling you all not to go to these places for earing, we do that too got to M once in a while.
But then I think nothing can match these homemade ones, they are delicious.
So why don't you try them :-)

For 4 burgers
4 burger buns ( I used pistole a small buns we get here in the bakery)
200 gm chicken breast
200 gm cooked Ham
1 egg yolk
1 onion finley chopped
2 sprigs of Tarragon
1 tbsp olive oil
Salt and Pepper to taste

For Dressing up the burgers
4 slices os sheep cheese or Manchego cheese
4 slices of ornage cheddarµ4 slice of Emmental
4 tsp  cream sauce ( recipe below)
4 leaves of salade

For the Cream Sauce.
2 tbsp greek youghurt
1 tbsp sour cream
1 tbsp mustard paste
2 small shallots
few corrianger leaves
few sprigs of chervil
few chives
pinch of cumin
Salt and pepper to taste
Mix the youghurt, sour cream, and the mustard in a bowl and add salt and pepper to your taste.
Chop the onions fine and all the herbs, mix them into the bowl with the sauce.
Add the cumin and taste to see if you need more salt or peper.

For the chicken burger.
In a mxer , Mince the chicken breast with ham, eggs, chopped onions and the taragon.
Add salt and pepper to taste. Keep this mix in the fridge for 30 minutes.
After that make 4 equal balls from the mix and press lightly on top so they can get a little flat.

Preheat the oven for 180°c.
In the mean time heat a pan add the oil and grill the burgers each side for 5 to 6 minutes or till it is cooked through.

Slice the buns half. On one half of the buns, add a slice of cheddar and a slice of sheep cheese.
Bake this buns in the oven for 3 minutes. After the 3 minutes take bread out of the oven, take the grilled chicken burger and lay on top of the melted cheese, then on top a slice of Emental and a salade leaf.
On the other half of the bun spread enough sauce and keep on top of the other half with the chicken etc...
Serve with home made friets ( french fries)
 

Thursday 13 September 2012

Black Berry Margarita

In August Shyama was doing Summer job and she was lucky enough to get a summer job in the City Hall public Library ( this is is second year) .
She loves working there as she like people who she works with.
All her friends do summer job for a month, that is normal here.
I guess it is also good for parents as we never have to give pocket money for her and anwyway she is really carefull with her money, she is like she is saving up for going for a world trip after her studies :-)

Anyway it was 31st of August and her last day of work and we decided evening we should celebrate her last day of work with a cocktail and some snacks. And here we love any excuse for a party.
So I made these Black Berry Margarita .
Recipe is for 1 person


3 tbsp of blackberry sauce ( I used some 250 gm of blackberry, added a splash of water and then puredd it and ssieved it so you don't have the seeds) with this much i could make 6 glasses, i didn't weigh so can't give you the excact amount i used,plus keep few aside so that you can decorate it when you serve them)
50 ml Tequila
20 ml Triple sec ( i used this, but if you don't have this you can also use Cointreau)
10 ml lime juice
10 ml sugar syrup ( the recipe said 20 ml, the first glass was made with 20 ml and we thought it was a bit sweet so when we did the second serving used only 10 ml)
Shake all the above ingridients in a cocktail shaker and pout into a Margaritta glass with loads of crushed ice.
My ice was not crushed that good as i was too lazy but when i make next time I will sure crush it more.


Monday 10 September 2012

Summer Berry Tart

I have to say these days I bake very less, I remember the time when I used to bake at least 3 times a week ( well that time Shyama was in school and a lot of time her friends came over )
And these days I just bake for Sunday afternoon coffee, ( we go every sunday afternoon to my inlaws place, ok we go during the weekdays when ever we have time, but sunday it is like afternoon coffee is there)
Usually my MIL buys something from the pastry shop unless if I tell her don't buy as I am making something, and I think it seems to be like every sunday I bake only because I love to bake and I am like atleast it is shared with everyone so the calorie intake is dicided :-)

So this is the fruit tart I made for a sunday.
I do have to say, I was in a hurry to make the tart and in my hurry after baking the tart shell i was removing it ti cool down and as I was in a hurry it slides ( just little ) and I saw it all breaking up, you can imagine how i felt and I didn't want to give up as I had made the custard and bought all the fruits I made the pasty again.
But as you can see it was really worth it.
It was super yumm, just that next time I think I will make my filling a bit more thicker .

For the tart shell I used the recipe from Doriee Greenspan book Baking.

So make the tart shell according to that recipe and let the tart shell cool.
Now for the filling and to decorate the cake.
I didn't weigh the fruits, just took a whole bunch of mixed summer fruits like Balck berries, strawberries and Raspberries. ( You can use what ever fruit you like)
I do have Step by Step pictures how to make this, will add the pics soon.

For making the filling.

3 egg yolks
50 gm powdered sugar
2 tbsp corn flour
2 tbsp flour
1 vanilla stick
300 ml milk
150 ml thick cream
2 tbsp of any red jam
2 tbsp of strawberry liqueour (optional, you can use water)
Bring the milk to boil and add the vanilla stick cut it open and add into the milk and let it steep for 15 minutes, after then take the vanilla stick and scrape out all the seeds and add it to the milk.
Add the egg yolks, powder sugar, corn flour and flour in a bowl and cream everything very well.
Reheat the milk if is gone cold and add to this egg/flour mix stirring it continiously.
Pour this mix back into the pan and cook in a small fire till it is thick, sirring continiously otherwise you will get lumps and take care as ot gets thick really fast.
Pour this into a glass bowl, take a pastic foil and cover , the foil should touch the thick custard to avoid a skin forming when it is cold, keep this in the fridge to get cold. ( I made the custard the day before)
Whipp up the cream and then mix it with the custard .
Spread this mix into the cooled tart shell and decorate with the fruits.
Heat the jam witht the liquour and let it cool a bit, with a brush just brush over the fruit and serve.


Thursday 6 September 2012

Vengaya Kara Kuzhambu


When ever i go to Nags place Edible Garden , I am always impressed, she is a young woman with talent for cooking and baking, plus point is most of her recipes are so easy to make.
I have made couple of dishes from her place which is always so easy and yummy and I still have loads of bookmarked recipes which I have to do from her place too.

There are sometimes when I see a picture of a food, I really want to grab and eat it.
That is what I thought when I saw the picture of th eplate of food Nags added in her Flickr account, it was a picuture of a plate of rice and a curry poured over to the rice.
I think this was in May.Don't remember the exact month anyway when hubby went to Austria for a week for his work I decided I will make this for lunch, plus point was ,as I was alone I could have it for two days:-)
I really Loved it and it was so easy to make.
So when Apolina and family came to visit us in August , I made this as part of lunch and hubby loved it so much that when I was plaaning the Onam Dinner he asked me why don't you make that onion curry.

And I am sure this will be showing up in my dinner/Lunch more.

If you like to make this delicious kara kozhambu, hopp over to Nags delicious blog for the recipe


Monday 3 September 2012

Semiya Payasom

Last week it was Onam and I was like should I make a huge Onam Sadya ( in our case it was Dinner) as Traditionally back at home it is all vegetarian dishes.
The reason I was reluctant was because first of all I don't get all the Indian vegetables and secondly if I make all veggie Sadya and ask my in laws etc they would not enjoy.
So in the end I decided to celebrate Onam but then with dishes everybody will love.
So there were few Veg and few Non Veg dishes.

When it came to dessert I gave the choice to Hans and Shyama and they said they would love to have Semiya payasom.


So the day before the Onam I was slaving in the kitchen for few hours as I wanted to make most of the dishes and keep in the fridge so that I won't have too much work on the day it self.
But it is always a pleasure to prepare all these dishes especially if they love the food you have prepared which all of them did anyway.
And also had the plus point of getting all the oh and wow when the thali plates were brought to the dinning table.
Traditionally they are served in banana leaves back home but from were can i get them here :-)


So here goes the payasam recipe courtsey to my eldest sis :-)

I cup Vermecelli ( broken into small pieces) in India we use and here i ised too the vermecelli you get for making this dessert)
Milk 1 cup
Water 1/2 cup
Ghee/ Butter 2 tbsp ( I used butter)
200 ml sweet condensed milk, ( I am just giving the measurement, but i didn't measure it, i just poured and then tasted it and if it was not sweet I added more, depends on your taste)
Raisins 15 to 20
Cashewnuts 15 to 20
Cardamom powder 1/4 sp
Pinch of salt

Heat the ghee / Butter and fry the raisins and cashewnuts, remove and drain in a kitchen paper.
In the same pan roast the vermecelli till it turns to light golden colour and ramove it to a plate.
In a pan add the milk and water when it boils add the fried vermicelli, cook it, mine only took few minutes and if you think there is not enough liquid add more milk.
You must stir it continiously so that it doesn't stick to the pan. When the vermicelli is cooked add the condensed milk and give it a stir. Add the cardamom powder , the nuts and the raisins,remove  from the heat.
You can serve this hot or at room temperature. I love it it room temperature.